


84 Installing System Components
12
Enter the System Setup program and ensure that the hard drive’s
controller is enabled (see "Entering the System Setup Program" on
page 41).
13
Exit the System Setup program and reboot the system.
See the documentation that came with the hard drive for instructions on
installing any software required for drive operation.
NOTICE: To avoid possible hard drive failure, do not turn off or reboot your system
while the hard drive is being formatted.
Configuring the Boot Device
NOTE: System boot is not supported from an external device attached to a SAS or
SCSI adapter. See support.dell.com for the latest support information about booting
from external devices.
If booting the system from a hard drive, the drive must be attached to the
primary (boot) controller. The device from which the system boots is
determined by the boot order specified in the System Setup program (see
"Using the System Setup Program" on page 41).
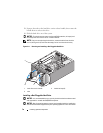
Diskette Drive (Optional)
Removing the Diskette Drive
CAUTION: Only trained service technicians are authorized to remove the system
cover and access any components inside the system. Before performing any
procedure, see your Product Information Guide for complete information about
safety precautions, working inside the computer, and protecting against
electrostatic discharge.
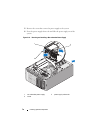
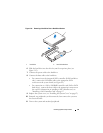
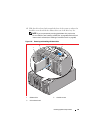
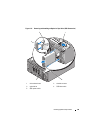
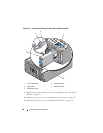
1
Turn off the system and attached peripherals, and disconnect the system
from the electrical outlet and from the peripherals.
2
Remove the front bezel (see
"Removing the Front Bezel
" on page 63
)
.
3
Remove the system cover (see "Removing the System Cover" on page 66).
4
Remove the processor airflow shroud (see "Removing the Processor Airflow
Shroud" on page 70).
5
Disconnect the power and data cables from the diskette drive.