


Custom Printing
2-6
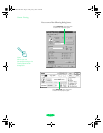
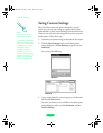
4. Choose one of the following
Print Quality options:
◗ Economy
For low-resolution rough drafts on plain paper. Saves
ink.
◗
Normal - 360 dpi
For most documents on plain paper, transparencies, or
360 dpi Ink Jet or Banner paper.
◗
Fine - 720 dpi
For high-resolution output. Works best on photo
quality media (including EPSON Photo Quality
Banner paper), back light film, or canvas cloth.
◗
SuperFine - 1440 dpi
For the highest-resolution output on photo quality
media, back light film, or canvas cloth only.
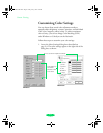
5. Choose the
Media Type setting you want to use, following
the guidelines on page 3-4.
6. Press the
Media Type button on the printer’s control panel
to select the media you loaded in the printer and selected in
step 5. If your media type is not listed on the control panel,
select
Other/Media Selection Off.
7. Select Color or Black ink.
8. Choose one of the following
Halftoning options:
◗
No Halftoning
For printing black text only.
◗
Error Diffusion
For printing photographic or video/digital camera
images. Blends each dot of color with the surrounding
dots.
◗
Fine Dithering, Coarse Dithering
For printing charts, graphs, and other images that
require precise, solid areas of bright colors. Arranges
dots in orderly patterns. Use
Coarse for images with
more shading and less detail. Use
Fine for images with
more detail and less shading.
Note:
The Print Quality is
selected automatically
depending on the current
Media Type. If you choose
a Print Quality setting that
is not appropriate for your
media, the driver changes
the Media Type setting.
Be sure to check both of
these settings to make
sure they are correct for
the media you loaded.
Note:
In Automatic mode, the
Halftoning setting is
selected based on the
data in your print job.
In Advanced mode,
Halftoning is preselected
for each document type
setting. The No Halftoning
option is available only
when you select Black as
the Ink setting.
Loire-PLUS.BK.book Page 6 Friday, May 2, 2003 2:56 PM