


Printing on Special Media
3-31
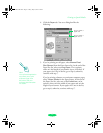
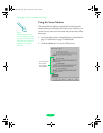
6. Type a name for your custom size in the
New Paper Size
box. Then type your paper’s width in the
Width field and a
length of up to
44 inches for the Height. (This works for
banners in either “landscape” or “portrait” orientation.)
Click
OK.
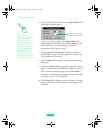
7. Choose
Portrait or Landscape, depending on the
orientation of the banner or document you created. Set the
printable area if necessary.
8. Click
OK.
9. Choose
Print from the File menu or click the print icon in
your application. You see a printer settings dialog box (as
shown on page 1-9).
10. Choose the
Media Type setting that matches your banner
paper or canvas cloth as described in the table on page 3-4.
(For continuous computer paper, choose
Plain Paper.)
11. Check the rest of the printer software settings as described
in Chapters 1 and 2. Then click
Print to print your banner.
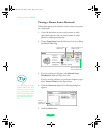
12. When your print job finishes printing, the printer feeds the
paper to the default cut off (or tear off) position (as long as
the auto tear-off feature is on in default-setting mode). If
necessary, press the
Micro Adjust buttons to move the
paper forward or backward to the cut off position.
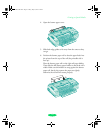
13. If you are using the optional Banner Paper Cutter, follow
the instructions on in the following section. Otherwise, use
scissors to cut the paper.
To remove continuous paper, see page 3-19.
If you want to print another roll paper project, the printer feeds
the roll paper back to the loading position when it receives a
new print job.
If you won’t be using your roll paper for awhile, store it in its
original packaging. See Appendix B for optimum storage
conditions.
Note:
Your software application
may allow you to print a
banner longer than 44
inches. See your
software documentation
for details.
Note:
The printer saves the cut
off (or tear off) position
and it remains in effect
until you change it again,
even after turning off the
printer.
Loire-PLUS.BK.book Page 31 Friday, May 2, 2003 2:56 PM