


2-25
Using Paper and Other Media | 2-25
Creating Custom Print Settings
You can use the printer’s SelecType
™
menu options to control how the
printer handles and prints on various kinds of paper. See these sections:
•
“Using the Printer Setting Menu” below
•
“Using the Paper Configuration Menu” on page 2-28
Using the Printer Setting Menu
You can use the Printer Setting menu to set the platen gap, print page lines,
control roll paper margins, and turn on or off paper monitoring features.
These setting apply to all your print jobs. You can restore the default settings
as described on page 2-27.
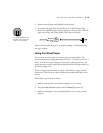
Setting the Platen Gap
When you print on extra-thin or thick stock, you may need to adjust the
platen gap setting. This physically moves the print head closer to or farther
from the paper. Normally, the
AUTO
setting allows the printer to adjust
automatically. However, if print quality is not satisfactory when you use
paper of unusual thickness, change this setting to
NARROW
or
WIDE
, as
needed. Follow these steps:
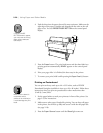
1. Press the
SelecType
button.
PRINTER SETTING MENU
appears on
the display.
2. Press the
Item
button.
PLATEN GAP=AUTO
appears on the display.
3. Press the
+
or
–
button to select
PLATEN GAP=WIDE
or
PLATEN
GAP=NARROW
.
4. Press the
Enter
button to save the new setting.
5. Press the
Pause
or
SelecType
button to exit the Printer Setting menu.
The letter
W
or
N
appears on the right side of the control panel display to
remind you of the new setting. When you switch media, don’t forget to
change this setting back to
AUTO.
Caution
The printer could be
damaged if the print
head comes in contact
with the paper.
Note
You may also need to
profile your paper’s
thickness after changing
the platen gap. See
page 2-29.