


Replacing and Adding Internal Devices 25
5
If necessary, set any jumpers on the CD drive assembly. (See your drive
documentation for proper drive jumper settings and cable orientation.)
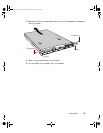
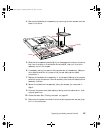
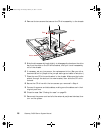
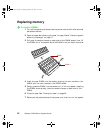
6 Place the CD drive assembly in the chassis. Make sure the hooks extend
through the slots on the bracket, then slide the CD drive assembly
forward.
7 Secure the CD drive assembly with the two screws you removed in Step 4.
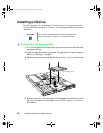
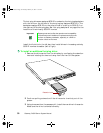
8 Connect the power and data cables, making sure the cables are in the
correct position and orientation.
The IDE cable ships with the CD drive kit. Make sure you route the cable
directly from the CD drive, through the cable clamp, and to the primary
IDE connector on the system board. Other routing may interfere with
internal airflow and the thermal characteristics of the server.
9 Close the case. See “Closing the case” on page 20.
10 Reconnect the power cord and all other external peripheral devices, then
turn on the system.
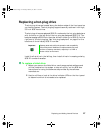
Replacing the CD drive assembly
The CD drive assembly is located beside the diskette drive assembly in the
center of the front panel.
To replace the CD drive assembly:
1 Turn off the system and disconnect the power cord and all other external
peripheral devices.
2 Open the case. See “Opening the case” on page 18 and “Preventing static
electricity discharge” on page 17.
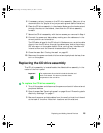
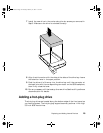
3 Remove the power and data cables from the small printed circuit board
at the back of the drive. Note their locations and orientations.
Important The replacement drive should include the bracket and
small circuit board. If it does not, transfer those
components to the new drive.
8507328.book Page 25 Thursday, February 15, 2001 11:28 AM