


58 Intel® NetStructure™ ZT 8101 10/100 Ethernet Switch User’s Manual
Using the Telnet Console
To update firmware
The switch can hold only one image of the firmware. The switch is rebooted after new firmware is
downloaded. If you have any current settings that you have not saved to non-volatile RAM, use the
Save Changes option on the Main Menu before starting these steps.
1. From the Main Menu, select
Switch Utilities | Download Firmware from TFTP Server and
press
Enter.
2. In the Server IP Address field, enter the IP address of the TFTP server.
3. In the Path\Filename field, enter the path and the filename to the firmware file on the TFTP
server, based from the root of the server.
4. Highlight
SAVE SETTINGS and press Enter. This saves the information so that the next time
you access this screen, you won’t have to enter the address or the path\filename.
5. To start the download, highlight
DOWNLOAD and press Enter.
When the download is completed, the switch automatically reboots and executes the new runtime
firmware.
Note: If FLASH becomes corrupted because you lose power when upgrading the firmware, you must use
Zmodem to fix the problem. See “Upgrading Firmware through Zmodem” on page 21.
To download a configuration file
1. From the Main Menu, select Switch Utilities | Download Configuration from TFTP Server
and press Enter.
2. In the Server IP Address field, enter the IP address of the TFTP server.
3. In the Path\Filename field, enter the path and the filename to the file on the TFTP server.
4. To start the download, highlight
DOWNLOAD and press Enter.
When the download is completed, the switch saves the configuration in NV-RAM and
automatically reboots.
To upload a configuration file
1. From the Main Menu, select Switch Utilities | Upload Settings to TFTP Server and press
Enter.
2. In the Server IP Address field, enter the IP address of the TFTP server.
3. In the Path\Filename field, enter the path on the TFTP server and the filename.
4. Highlight
SAVE SETTINGS and press Enter. This saves the information so that the next time
you access this screen, you won’t have to enter the address or the path\filename.
5. To start the file transfer to the TFTP server, highlight
UPLOAD and press Enter.
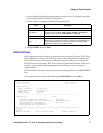
To upload a history log file
1. From the Main Menu, select Switch Utilities | Upload History Log to TFTP Server and
press
Enter.
2. In the Server IP Address field, enter the IP address of the TFTP server.