


Chapter 4---Optical
4-6
Model 250 Service Manual
5.
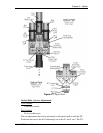
Disconnect the orange Cathode cable from the Igniter, using the 7/16-inch
wrench (see Figure 3-7).
6.
Cut the cable tie that is wrapped around the ferrite inductor (metal tube
with white cap below the blower).
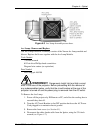
7.
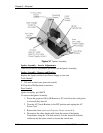
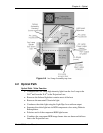
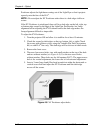
Disconnect the Arc Lamp door fan cable. This cable runs through the door
and out the bottom of the Arc Lamp Assembly housing (below the right
side inFigure 4-3). It provides power to the Arc Lamp door fan through the
white socket shown to the right of the Arc Lamp fan in Figure 4-3.
Disconnect the cable at the socket connection below the Arc Lamp
housing. Disconnect the top fan cable.
8.
Disconnect large blower fan connector.
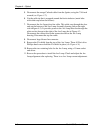
9.
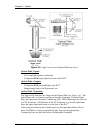
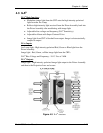
Remove the FA shield from the top of the Arc Lamp. Three #1 Pozi-drive
Phillips-head screws hold the FA shield in place (see Figure 4-4).
10.
Remove the two retaining bolts for the Arc Lamp, using a 10-mm socket
and driver.
11.
Reverse the procedure to install the Arc Lamp. Check and adjust the Arc
Lamp alignment after replacing. There is no Arc Lamp current adjustment.