


Chapter 4---Optical
4-18
Model 250 Service Manual
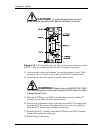
WARNING!!!
Always wear an ANSI/ASTM 10,000
volt rated safety glove when working around CRTs due to the High
Voltage present there.
NOTE:
If the ILA
®
/Relay Lens/CRT assembly cannot be moved close
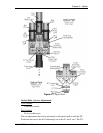
enough to get a good spacer ball focus, loosen the CRT Lens Stopper Ring
in front of the CRT Holder Ring using a 2.5-mm Hex wrench. Move the
CRT snug against the collar to get additional range, and then, retighten the
collar.
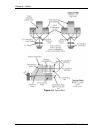
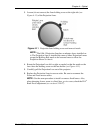
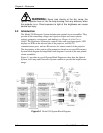
10. Using the 4-mm hex-head wrench, loosen the two hex bolts (see Figure
4-10) on the ILA
®
assembly in front of the Relay Lens.
11. Slide the Relay Lens/CRT/ILA
®
assembly forward or backward to achieve
the sharpest spacer ball focus.
NOTE:
Do not use the zoom lens focus while performing this step.
12. Repeat Steps 6-11 until the spacer balls stay in focus through the entire
zoom range. The spacer balls may go slightly out of focus in spots while
zooming up or down, but they should be in focus at the smallest and
largest images.
13. Tighten the hex bolts on the Green ILA
®
Assembly and the wing nut on
the Green Relay Lens.
14. Repeat Steps 9-13 for other colors that need ILA
®
Back Focusing. Be sure
to hide the other two colors.
To adjust the ILA
®
Back Focus for a Fixed Lens:
1. Power the projector ON and allow it to stabilize for 15 minutes.
2. Remove the rear cover and tilt up the Electronic Module.
3. View Green. Hide Red and Blue.
4. Select the Focus Pattern (Test Pattern #6).
5. Select Projection Lens from the menu.
6. Use left and right arrows to focus the projection lens to get sharply
focused spacer balls.
7. Put on safety gloves (see Safety section for gloves type) then loosen the
wing nut on the Green Relay Lens, (or whichever lens is being focused).
NOTE:
If the ILA
®
/Relay Lens/CRT assembly cannot be moved close
enough to get a good spacer ball focus, loosen the CRT Lens Stopper Ring
in front of the CRT Holder Ring using the 2.5-mm Hex wrench. Move the
CRT snug against the collar to get additional range, then retighten the
collar.