


A-2 5E6155 January 10, 2006
Quality Control Procedures
Running a QC Baseline
Test
Per the MQSA, a baseline test must be run when the 8900 is first installed
and must be repeated every time a box of film with a different emulsion
number is used. This test sets up a baseline set of film parameter values
that shall be used as a standard for comparison in daily quality control
tests. Kodak recommends the procedure described below as a means of
complying with this regulation.
Procedure for the
Installing Field Engineer
The installing field engineer verifies that the 8900 meets its performance
specifications, runs the baseline test described below, and prints a clinical
image of the site's choice. The site's responsible healthcare professional is
asked to approve that the 8900 produces an acceptable clinical image. If
the image is not acceptable, the field engineer repeats his procedures until
the settings for the baseline print produce acceptable clinical images.
Procedure for the QC
Technologist
After an acceptable installation, the user facility's technologist must repeat
the baseline test whenever a change occurs in film lot number.
NOTE: The following is an example of a film lot number:
020662
-0211-A-019. The film emulsion number is underlined.
Baseline Test 1. Apply power to the 8900 and allow it to warm to READY, as indicated
on the local panel. Request a Calibration Test Print (see “Requesting a
Calibration Test Print” on page 3-19) to put its Automatic Image
Quality Control (AIQC) system in control.
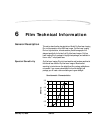
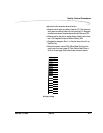
2. Print two QC Step Wedge test films (see “Requesting a QC Step
Wedge” on page 3-20). See the figure on the next page for a sample
step wedge.
3. Using a densitometer, read and record the density of each step (1
through 21) on each of the two test films. (For consistency from film
to film, always read density at the center of each wedge.) The QC Step
Wedge is positioned on the film to allow for the use of an automatic
densitometer such as the X-Rite Model 391 Densitometer for
automatic density recordings.
NOTE: You can choose to use a clear area on the test films instead of the
actual step 1 area to take the “step 1” density reading.
4. Determine and record the average of the two densities read for each
step.
5. Select from the average values calculated from the 21 steps to