


Operating the LED Display STS2
106
6. Verify that the preferred source LED (green) (LED_PREFx) is lit for the source that you want the
switch to be using.
7. Verify that the green LED for the corresponding SCR (STS1 or STS2) is lit, indicating that the
SCR is closed.
8. Close Output Breaker CB3 (and CB3A in a redundant output configuration).
9. Verify the CB3 LED is lit, indicating that CB3 is closed and the output and load are energized.
• In a redundant output configuration, verify the CB3A LED is lit, indicating that CB3A is
closed and the output and load are energized
10. Press the Reset and Silence buttons simultaneously to reset any previous alarms.
11. Verify that no red or yellow (amber) LEDs are lit indicating an active alarm, transfer is inhibited
or a bypass circuit breaker is closed.
If the alarm LED remains lit, check the PC terminal to identify the alarm. Refer to 11.0 - Alarm
and Faults for a description of the alarms and possible causes. All active alarm conditions should
be corrected before proceeding.
12. If the unit is supplied with an output distribution cabinet, close output breakers as required.
13. Turn on the load equipment following the load equipment manufacturer’s recommendations.
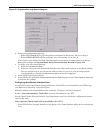
14.2.2 Manual Transfer / Preferred Source Selection
The preferred source buttons allow you to change the preferred source. Transfers are only permitted
when the voltage and current are within their proper operating range and the sources are synchro-
nized. Transfer is inhibited if the deviation exceeds the parameter set in the Source Set Points.
To manually select the preferred source:
1. Ensure that the Transfer Inhibit (NOXF) LED is not lit.
If the Transfer Inhibit LED is lit:
• Check to see if the red alarm LED is lit.
• If the alarm LED is lit, check the alarm messages on a PC terminal.
• Correct alarm conditions before attempting a source transfer.
2. Verify that the LEDs are lit for both sources, indicating power is present and within acceptable
tolerances.
3. Verify that the LEDs for the SCRs (STS1 and STS2) are lit.
4. Verify that the input breakers CB1 and CB2 are closed.
• Verify that their respective LEDs are lit.
5. Push the Preferred Source button for the desired source. See Table 16 on page 104.
The Preferred Source (LED_PREFx) LED turns on for that source.
When conditions are correct, the switch transfers the load to the alternate source by selecting the
alternate source as the preferred source.
This source is now monitored as the preferred source throughout the various configurations set up
through the PC terminal.
6. Check the LEDs to verify that the correct source is designated as the preferred source and that
the input source changes to the desired source and the output (OUT) LED remains lit.
NOTE
If one source will be de-energized for an extended period (hours or days), set the unit to bypass
mode for the remaining source. Without using bypass, if a failure occurs in the switch
components for remaining source, the STS2 does not have a second source to switch to and the
load would not receive power. See 14.2.3 - Maintenance Bypass on page 107 for bypass
instructions.
NOTE
When the remote source selection option (Remote Control) is activated, a change of state
(Remote Preferred Source Selection) may initiate a transfer if the appropriate contacts are
closed.