


Beyond the basics
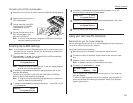
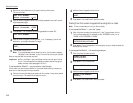
1
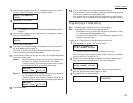
Press
PROGRAM
,
K
, 2,
ENTER
. The
LCD
shows:
2
Use the numeric keypad to enter the passcode. Here, we’ve entered 6296:
3
Press
ENTER
.
• If you’ve entered the correct passcode, your fax machine will print all docu-
ments in its memory and then erase them. Then it will turn security
reception back off until the next time your machine is set to secure receive.
• If you’ve entered an incorrect code, your fax machine will refuse to print,
and security reception remains active.
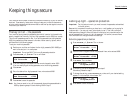
Masking the PIN
To prevent unauthorized long-distance calls, some office telephone systems require
you to enter not only the phone number but also a personal identification number
(
PIN
) whenever you dial an outside number beginning with 1.
If that’s true for you, you’ll probably want to keep that
PIN
confidential, so unautho-
rized persons can’t use it. Fortunately, your fax’s
PIN
mask feature makes such
confidentiality possible. With the
PIN
mask activated, you can dial a fax number
plus a
PIN
, but the
PIN
will not appear in a journal, error message printout, delayed
command list or even
TCR
, where an unauthorized user might see it. The
PIN
may be
up to eight characters in length (it can include the * or # symbols, if necessary), and
can be entered from the numeric keypad.
Important: For this feature to work, the passcode (see page 2.45) must be some-
thing besides 0000, and you must know the passcode.
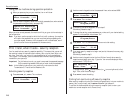
There are three possible settings for the
PIN MASK
feature:
• Off — The feature isn’t working. Any
PIN
you enter will appear on any display or
printout which shows what you dial.
• Mode 1 — Each remote fax unit has a departmental
PIN
access code.
• Mode 2 — Each fax user has a departmental
PIN
access code.
Note: If you select Mode 1 and you will use a one-touch or speed-dial number, you
must store the remote unit’s
PIN
access code within that number. However,
if you select Mode 2, this isn’t necessary. (See “Autodialing while using the
PIN
mask,” this page, right column for further details.)
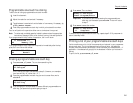
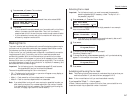
Activating the
PIN
mask
Important: For this feature to work, you must have preset the passcode to
something besides 0000. If necessary, review “The key to it all —
the passcode,” page 2.45.
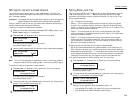
1
Press
PROGRAM
,
J
, 1, 7,
ENTER
. The
LCD
shows:
2
Use the numeric keypad to enter the four-digit passcode. In our example
here, we’ve entered 2099.
Note: If you enter an invalid passcode, the machine’s security feature will
reject the attempt and abort the operation.
3
Press
ENTER
.
4
If the setting you see is acceptable, skip to step 6.
Otherwise, proceed to step 5.
5
To change the setting, press
PROGRAM
repeatedly until your desired setting
appears. In this example, we’ve chosen “Mode1.”
6
Press
ENTER
.
Autodialing while using the
PIN
mask
Note: The following instructions presume you understand how to set and use your
machine’s autodialer. If you need to review, see pages 2.8–2.13.
Note: If the
PIN
mask feature is off, you use the autodialer normally.
If you’ve specified “Mode 1” — the
PIN
goes in
In Mode 1, before autodialing a number for the first time, you must add the
PIN
to
its stored one-touch key or speed-dial number. Here’s how:
PIN Mode: Mode1
Program/Enter
PIN Mode: Off
Program/Enter
Set PIN Mode
Enter Passcode :2099
Set PIN Mode
Enter Passcode :****
Print Mem Rx Doc.
Enter Passcode :6296
Print Mem Rx Doc.
Enter Passcode :****
2.47