Chapter 2 Setup and Configuration
© National Instruments Corporation 2-15 NI CVS-1450 Series User Manual
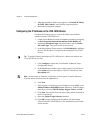
Acquiring an Image in Vision Builder AI
Complete the following steps to acquire an image in Vision Builder AI.
1. Launch Vision Builder AI on the development computer.
2. In the Vision Builder AI Welcome screen, expand the Execution
Target drop-down listbox and click Select Network Target.
3. Select the CVS-1450 device you configured and click OK.
4. In the Vision Builder AI Welcome screen, click Configure
Inspection.
5. From the Acquire Images palette, click Acquire Image (IEEE 1394).
6. Click the Snap button to acquire a single image, or click the Grab
button to acquire continuous images.
7. When you have configured your acquisition, click OK to add the step.
You can now add inspection steps as documented in the NI Vision
Builder for Automated Inspection Tutorial.
LabVIEW Real-Time Module with the Vision
Development Module: Setting up the Development
Computer
This section describes the sequence for installing the application and driver
software on the development computer, obtaining an IP address, installing
software on the CVS-1450 device, and configuring the CVS-1450 device
to acquire an image using the LabVIEW Real-Time Module.
Note This section applies only to LabVIEW Real-Time Module users. If you are using the
Vision Builder AI software, refer to the Vision Builder AI: Setting up the Development
Computer section.
The following items are necessary for setting up the development
computer.
❑ LabVIEW and LabVIEW Real-Time Module software
❑ Vision Development Module software
❑ NI-IMAQ for IEEE 1394 Cameras driver software


