12
Names and Functions of Parts (Continued)
13
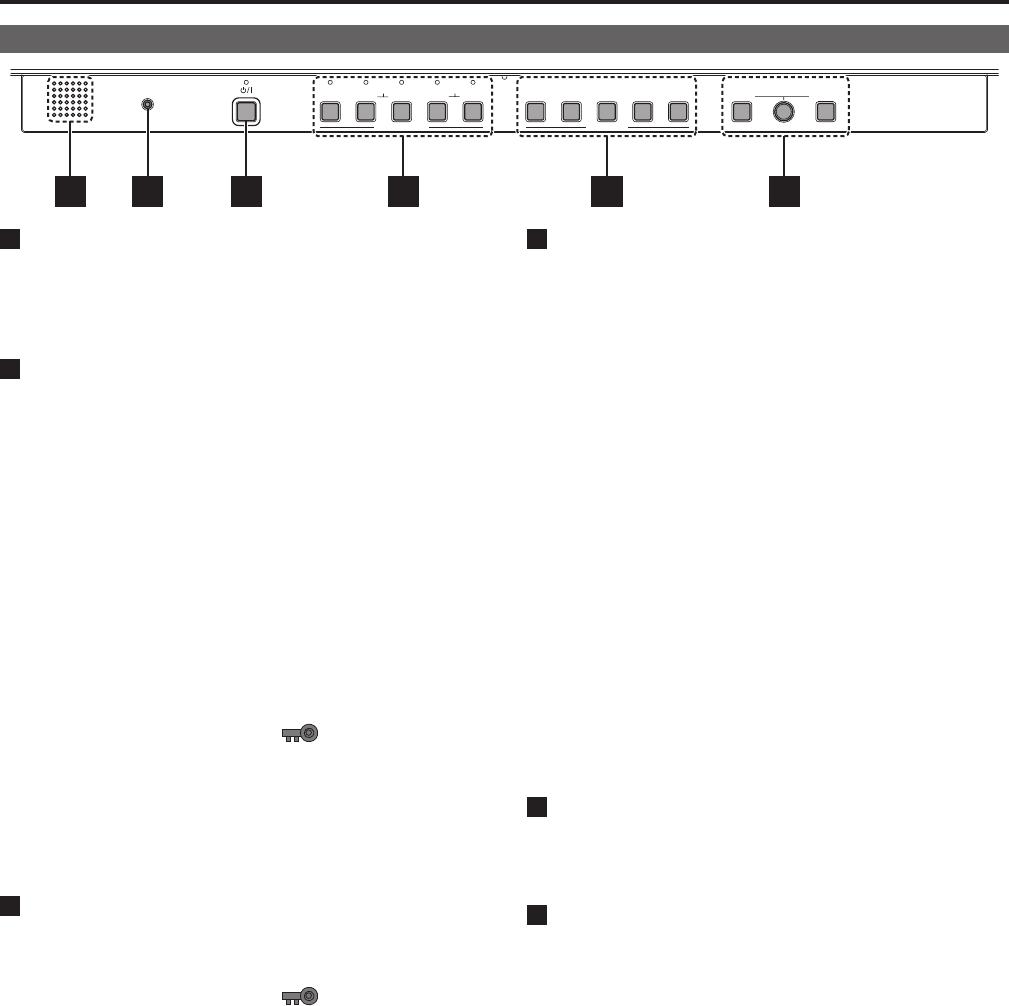
Front Panel
SDI
DUAL SINGLE
INPUT SELECT FUNCTION PICTURE VOLUME
DisplayPort
HEADPHONES
DUAL SINGLE 1 2 3 4 5 MENU RETURN
HDMI
5 6 1 2 3 4
1
POWER <8> switch
Switches the power on/off. When the power is turned on,
the green lamp lights.
To turn the power off, press and hold the switch for at least
three seconds.
2
INPUT SELECT buttons
Selects the signal input line. The green lamp above the
pressed button indicates the selected input line.
SDI: Serial digital interface input (3G/HD
compatible)
DisplayPort DUAL: DisplayPort input (HDCP compatible)
DisplayPort SINGLE: DisplayPort input (HDCP compatible)
HDMI DUAL: HDMI input (HDCP compatible)
HDMI SINGLE: HDMI input (HDCP compatible)
•When the power is turned on, the input line becomes the
one selected when the power was last turned off.
•When the FORMAT setting is set to AUTO, both the DUAL
and SINGLE LED indicators are lit when DisplayPort or
HDMI input is detected.
When it is set to 2K/HD/PC, the selection becomes SDI/
DisplayPort SINGLE/HDMI SINGLE.
•When the control lock is on, the
mark is displayed on
thescreenandtheinputlinecannotbechanged.(→page
48)
•When INT-SG (internal chart for adjustment [Color Bar +
Grayscale]) is selected, all the lamps above the <INPUT
SELECT> buttons are off. Use the [INPUT SELECT] menu
toselectINT-SG.(→page20)
3
FUNCTION buttons
FUNCTION1 to Function5:
Press a FUNCTION button to execute the function selected
for that button in the menu.
•When the control lock is on, the
mark is displayed
on the screen and the FUNCTION operation is disabled.
(→page48)
4
MENU button, rotary knob (with PICTURE push-on
switch), and RETURN/VOLUME button (→page 16)
Use these to display menus, select and adjust settings, and
execute items selected in a menu.
MENU: Displays [TOP MENU] ([MAIN MENU] (main
menu), [FUNCTION] menu, or [INPUT SE-
LECT] menu). Also press this to exit a menu.
Rotary knob: Turn the knob clockwise or counterclockwise
to move the cursor up or down or change a
setting value.
Press the knob to start changing or confirm a
setting value or display a submenu.
RETURN: Press this button to display the previous
menu or return the setting being set to the
original value.
When no menu is displayed, pressing the rotary knob <PIC-
TURE> or <RETURN/VOLUME> button displays a menu
other than the [TOP MENU].
PICTURE: When no menu is displayed, pressing the
rotary knob displays the [PICTURE] (picture
adjustment)menu.(→page17)
VOLUME:
When no menu is displayed, pressing the
<RETURN/VOLUME
> button displays the
audiovolumebarmeter.(→page17)
5
Speaker (monaural)
*
1
This allows you to check the audio.
•Audio is not output while headphones are connected to the
HEADPHONES output connector.
6
HEADPHONES output connector (M3 stereo mini jack)
*
1
Headphones can be connected to check the audio.
•The volume and sound quality differ depending on the
headphones.
*
1
For an 4K signal (SDI [QUAD], DisplayPort [DUAL], or HDMI
[DUAL]), you can check the audio of the input signal set in
the 4K INPUT SELECT item of the AUDIO menu for the cor-
responding connector.
<Note>
The brightness of the front LEDs can be changed in the [LED
BRIGHT]setting(→page33).However,thebrightnesswillalways
be in HIGH mode immediately after startup.


