


ULTRAMATRIX E-SERIES MANUAL
12
Perform the following installation steps for each computer that will be
connected to the UltraMatrix. Sequentially connect the computers
starting with computer #1.
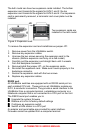
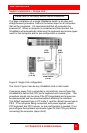
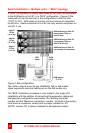
STEPS: (See Figure 3 for an example of a single Unit installation)
(Refer to the troubleshooting section for help if needed)
1. Connect all KVM stations to the UltraMatrix switches DB25F, KVM
connectors using the appropriate KVM cables.
2. Turn on all KVM stations video monitors and the UltraMatrix.
(Wait for the internal diagnostic check to complete and fade out)
3. Switch KVM station #1 to the CPU port being configured (starting
with CPU port #1). This is done by pressing and releasing the left
control [Ctrl] key and within 2 seconds, type in the CPU port # being
configured (starting with port 1) and press [Enter]. A connection
dialog box will display showing the connection status. (Figure 18)
4. Pre-configure the CPU port, if needed, as outlined in steps 4a-f if
the computer being connected does not use a PC2 type keyboard
or a PS/2 mouse (defaults). Pre-configure the CPU port before
connecting the computer. If the computer uses a PC2 type
keyboard and PS/2 mouse, connect it to the corresponding CPU
port. No pre-configuration is needed.
Pre-Configuration procedure
a. Call up the Configuration menu system by pressing and
releasing the left [Ctrl] key, then the [F12] key. (Figure 7)
Select “Computer” and press [Enter] (
b. Figure 9)
c. Select the computer to change the default keyboard and/or
mouse type, and then select the keyboard or mouse field for the
selected computer and press [Enter]. A selection box will
display, listing the supported keyboard or mouse types.
d. Select the correct keyboard or mouse type for the selected
computer and press [Enter].
e. Press [ESC] to return to the “Main menu” and save the changes.
f. Connect the computer to the pre-configured CPU port.
5. Boot the computer the KVM station is connected to if the computer
power was off. You should see the boot up sequence on the KVM
monitor. If the computer was connected to a pre-configured CPU
port with power applied, you should see that computers video.
6. Verify that the keyboard, video, and mouse on the connected
computer function properly before proceeding. Verify that other
KVM stations operate properly.
7. Switch KVM station #1 to the next sequential CPU port as explained
in step 3 and perform steps 4-6 for that computer and for the
remaining computers.