


38 | CHAPTER 5 – MAINTAINING AND TROUBLESHOOTING YOUR SMART BOARD
685ix INTERACTIVE WHITEBOARD SYSTEM
Part No. 99-00984-20 REV A0
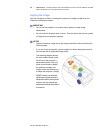
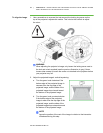
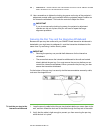
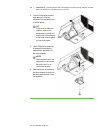
3. Adjust the projected image’s horizontal alignment.
a. Turn the blue knob clockwise if the image
is tilted with the right edge higher than
the left, until the top and bottom edges of
the projected image are horizontal.
b. Turn the blue knob counterclockwise
if the image is tilted with the left edge
higher than the right, until the top and
bottom edges of the projected image
are horizontal.
NOTE
Ignore the position of the rest of the image in relation to the interactive
whiteboard during this step.
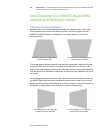
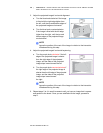
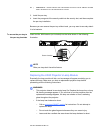
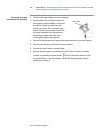
4. Adjust the projected image’s horizontal keystoning.
a. Turn the purple knob clockwise if the left
edge of the projected image is shorter
than the right edge of the projected
image, and the sides of the projected
image slope inward toward the left.
b. Turn the purple knob counterclockwise if
the right edge of the projected image is
shorter than the left edge of the projected
image, and the sides of the projected
image slope inward toward
the right.
NOTE
Ignore the position of the rest of the image in relation to the interactive
whiteboard during this step.
5. Repeat steps 2 to 4 in small increments until you have an image that is square
and parallel to the board. Once you are satisfied with the image, proceed to
step 6.