


2-1
Chapter 2
Hardware Installation
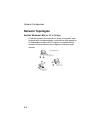
1. Select a Site – Choose a proper place for the access point. In
general, the best location is at the center of your wireless
coverage area, within line of sight of all wireless devices. Try
to place the access point in a position that can best cover its
Basic Service Set. (Refer to “Infrastructure Wireless LAN” on
page 3-3.) Normally, the higher you place the access point,
the better the performance.
2. Mount the Access Point – The access point can be mounted
on any horizontal surface or wall.
Mounting on a horizontal surface – To keep the access
point from sliding on the surface, attach the four rubber feet
provided in the accessory kit to the embossed circles on the
bottom of the access point.
Mounting on a wall – The access point should be mounted
only to a wall or wood surface that is at least 1/2-inch plywood
or its equivalent. Mark the position of the mounting screws
(included) on the wall. Set the 5/8-inch number 12 wood
screws into the wall, leaving about 3 mm (0.12 in.) clearance
from the wall. And then slide the access point down onto the
screws.
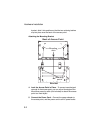
3. Attaching the Bracket – Line up the three mounting points
on the bracket with the three mounting slots on the rear of the
access point, as directed in the figure on the next page.
Place the mounting points of the bracket into the mounting
slots of the access point and while pushing down on the