


Adjustment
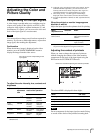
Adjusting the Color and Picture Quality
46
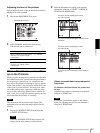
To adjust the contrast (DARK/LIGHT)
The contrast settings are divided into 15 steps, from
–7 to +7, indicated by a value and graph. The center
of the graph (0) corresponds to the standard setting.
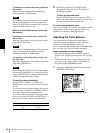
To adjust the sharpness (SHARPNESS/
INTERPOL.)
SHARPNESS:
You can set the sharpness to any of 15 steps from 1
to 15. A setting of step 8 corresponds to the
standard sharpness (default setting).
INTERPOL. (Interpolation):
You can select either ON or OFF depending on the
type of image.
Note
The effectiveness of SHARPNESS may differ
between ON and OFF settings of INTERPOL.
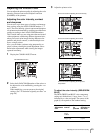
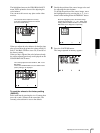
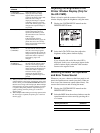
Once you have changed the value
Once you have changed the value, TEMP
(TEMPORARY) appears on the menu screen.
TEMP indicates that the settings are temporary and
have not yet been stored. If you turn off the power
of the printer while TEMP is displayed, the
adjusted values are not stored.
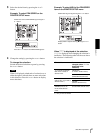
4
Select the SAVE COLOR number to which new
settings are to be stored using the SAVE COLOR
item.
To retain the originally set value
Select a SAVE COLOR number which is different
from the LOAD COLOR number selected in step 2.
5
Press the EXEC button.
The settings are registered in the SAVE COLOR
number selected in step 4.
TEMP disappears from the menu.
To continue settings for another LOAD COLOR
number: Repeat steps 2 to 5.
To finish the setting: Press the MENU button.
The regular screen appears.
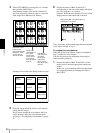
To copy the settings made for one LOAD
COLOR number to another LOAD COLOR
number
1
Select the source LOAD COLOR number for which
the settings to be copied are stored on the COLOR
ADJUST menu.
2
Select the target SAVE COLOR number to which
data is to be copied.
3
Press the EXEC button.
Settings stored for the LOAD COLOR number
selected in step 1 are copied to the SAVE COLOR
number selected in step 2.
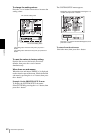
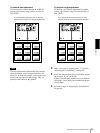
To recall the LOAD COLOR number in which
printout color settings (color intensity, contrast
and sharpness) are stored
Switch the desired LOAD COLOR number to green on
the COLOR ADJUST menu. On the printer window
display, display the desired LOAD COLOR number.
The settings of the currently selected LOAD COLOR
number are displayed.
The printout is made according to the setting of the
selected LOAD COLOR number as long as you do not
modify those settings.
MAG-GRN Make the
image
greenish.
g button Toward GRN
(green)
Make the
image
magenta
(pink).
G button Toward MAG
(magenta)
YEL-BLU Make the
image
bluish.
g button Toward BLU
(blue)
Make the
image
yellowish.
G button Toward YEL
(yellow)
Adjustment item When you want to
DARK Adjust the dark area of an image.
LIGHT Adjust the light area of an image.
When you want to Content of settings
Make a soft outline. To the left (toward step 1)
Make a normal
outline.
Centered (step 8)
Make a sharp outline. To the right (toward step 15)
When you want to Setting
Print out image data such as a figure
image or a landscape.
ON
Print out image data of computer graphics
or of an image with small letters.
OFF
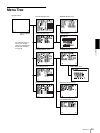
Menu
Adjustment
item
When you
want to
Button to
be
pressed
Adjustment
direction on
the menu