


Miscellaneous
Troubleshooting
63
Troubleshooting
If Damage is Suspected
The following troubleshooting checks will help you
correct the most common problems you may encounter
with your unit. Before proceeding with these trouble
checks, first check that the power cord is firmly
connected. Should the problem persist after you have
applied the remedy, unplug the unit and contact your
Sony dealer or local authorized Sony service facility.
Symptoms Possible causes and remedies
Nothing appears on
the video monitor
even if you press any
of the operation
buttons.
• The POWER switch of the printer is
not set to ON.
tSet the POWER switch of the
printer to ON.
• The POWER switch of the video
monitor is not set to ON.
tSet the POWER switch of the
monitor to ON.
• Connections may not be correct.
tCheck connections and rectify, if
necessary. (See page 11.)
No message appears
on the regular screen.
An incorrect signal is input.
tSelect another input signal on the
INPUT SETUP menu. (See
page 15.) Or, set the connected
video equipment to playback mode,
if it is currently set to another modes
such as stop mode.
No message or image
appears on the regular
screen.
• If an image captured in memory
appears when the SOURCE/
MEMORY button is pressed,
SOURCE on the OUTPUT SETUP
menu is set to THRU.
tChange the SOURCE setting to
EE. (See page 44.)
• When the menu is displayed by
pressing the MENU button, the
DISPLAY setting of the video
monitor is set to OFF.
tSet the DISPLAY setting to ON
by pressing the DISPLAY button.
(See page 36.)
No message appears
on the printer window
display. (Only for the
UP-21MD)
• The contrast of the printer display
window is not set correctly.
tAdjust the brightness of the
printer window display using the
LCD. CNTR. item on the
SYSTEM SETUP menu. (See
page 53.)
• The contrast of the printer display
window is set to OFF.
tAdjust the brightness of the
printer window display using the
LCD. CNTR. item on the
SYSTEM SETUP menu. (See
page 53.)
The printer does not
print.
• An error message appears on the
display.
tPerform the steps described in
“Error/Warning Messages” on
page 61.
• Paper that cannot be used with this
printer has been loaded.
tLoad the correct paper. Use only
ink ribbons and paper for this
printer. (See page 57.)
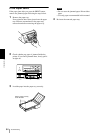
• The paper is not loaded correctly.
tCheck which side of the paper is
the printing side, then load the
paper again. (See page 14.)
A black line appears
on the printout.
Any portion for which there is no signal
is printed in black.
tAdjust the image area to be printed.
(See page 47.) Then, capture a new
image and print it.
The printer produces
a printout with a
black frame.
Any portion for which there is no signal
is printed in black.
tAdjust the image area to be printed.
(See page 47.) Then, capture a new
image and print it.
The printed image is
partially cut out.
Only part of the video signal has been
stored.
tAdjust the image area to be printed.
(See page 47.) Then, capture a new
image and print it.
The printout is
blurred.
A quickly moving image has been
stored.
tSet the memory mode to FIELD by
using the MEMORY FRM/FLD
item on the LAYOUT SETUP menu,
then print it. (See page 24.)
The printout color is
very pale.
The paper is not loaded correctly.
tCheck which side of the paper is the
printing side, then load the paper
again. (See page 14.)
The ink ribbon cannot
be loaded.
• You may be trying to load an ink
ribbon that can not be used with this
printer has been loaded.
tLoad the appropriate ink ribbon.
(See page 57.)
• The thermal is secured.
tTurn on the printer. The thermal
head moves so that you can now
install the ink ribbon. (See
page 56.)
The blank paper is
ejected even if you
press the PRINT
button and RIBBON
END message
appears.
The ink ribbon has been exhausted. Do
not reuse the ejected blank paper.
tReplace the ink ribbon. (See
page 13.)
Symptoms Possible causes and remedies