


Chapter 2—Installing the nTier700
June 2010 Spectra nTier700 Backup and Archive Appliance
39
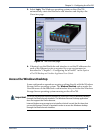
7. Wait for the system to complete its power-on sequence. During the
power-on sequence, the nTier700 initializes all of its installed
components and starts the BlueScale web server.
Notes: It can take up to ten minutes for the nTier700 to boot up for
the first time as it automatically starts the operating system,
loads software, and attempts to acquire an IP address.
The fans in the nTier700 produce a loud, high-pitched whine.
This sound is normal.
8. If desired, configure a fixed IP address for Ethernet port 1 as described
in the Spectra nTier700 Backup and Archive Appliance User Guide.
Next Steps
Your nTier700 hardware is now installed. For information about the
BlueScale web interface and how to use it to configure the nTier700, read
the following:
Read Chapter 3—Configuring the nTier700 on page 40 and
“Chapter 3 – Configuring the nTier500” in the Spectra nTier700 Backup
and Archive Appliance User Guide to learn how to configure the nTier700
for operation in your environment. This chapter also describes the
BlueScale web interface and how to access the Windows operating
system to install anti-virus and other application software on the
system.
Configure the network connections to the nTier700.
The Fibre Channel HBA uses soft addressing. By default, both ports
on the Fibre Channel HBA are set to initiator mode, meaning that
they send commands and data to another physical device (for
example, a tape library or tape drive) and receive status information
from that device.
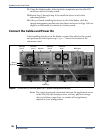
When connecting a backup server to the nTier700, the port you use
on the Fibre Channel HBA must be set to target mode. Use the
QLogic SANsurfer Application for Windows to configure the Fibre
Channel HBA.
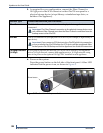
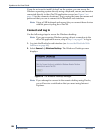
By default, the optional 10 GigE NIC card uses DHCP addressing.
Select Configuration > Network in the BlueScale web interface to
change the IP addresses as required for your environment.