Chapter 4 Installing Optional Hardware Components 4-11
4.6 Installing and Removing a PCI Card
For a list of the PCI cards available from your local Sun Sales representative, see
“Optional Hardware and Software” on page 1-5.
4.6.1 Installing a PCI Card
Note – If you are installing a full-length PCI card and you also want to install a
DVD-ROM drive, install the DVD-ROM drive first (see Section 4.4, “Installing and
Removing a DVD or CD-ROM Drive” on page 4-7). Otherwise, when you install the
DVD-ROM drive, you will have to remove the PCI card that you have installed.
To install a PCI card into the server, do the following:
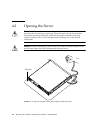
1. Remove the top cover by following the procedure described in “Opening the
Server” on page 4-4.
Make sure you wear an antistatic wrist strap and disconnect all power cables.
2. Remove the filler panel protecting the PCI connector.
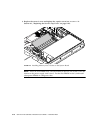
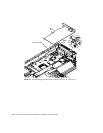
3. Loosen the captive screw holding the PCI slot’s retention bracket in place (see
FIGURE 4-7).
Rotate the retention bracket through 90 degrees (see
FIGURE 4-7). This releases the
filler panel in the PCI slot, enabling you to remove the filler panel. Remove it.
4. If you are installing a full-length PCI card, slide the PCI card retainer off the PCI
slide support rail on the system board.
5. Insert the PCI card firmly into the PCI connector (see
FIGURE 4-7) making sure that
the PCI card’s bracket is correctly positioned against the rear of the chassis.
The tapered end of the bracket must be inside the small metal tab designed for it on
the chassis (see
FIGURE 4-7).


