


3-22 Ultra Enterprise 6000/5000/4000 Systems Manual—November 1996
3
Maximizing Performance
The following guidelines will result in optimal memory interleaving across
boards for performance. These guidelines are for optimal performance and are
not requirements for a functional system. The guidelines apply to systems with
no SIMMS installed and when adding SIMMs to a system; if you are adding
SIMMs, you may need to move some SIMMs to meet the guidelines.
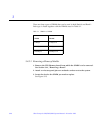
1. Install one bank on each board before installing the second bank on any
board.
It does not matter whether the first bank is bank 0 or bank 1.
2. Begin with the largest density banks first (128 Mbyte SIMMs), continue
with medium sized banks (32 Mbyte SIMMs), and finish with the smallest
banks (8 Mbyte SIMMs).
3. If there is remaining memory, start filling the second banks on the boards
in the same order as the first banks.
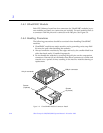
Installation
1. Place the CPU/Memory board on which the SIMM is to be installed on an
antistatic mat.
2. Carefully remove the new SIMM from its protective packaging and place
it on an antistatic surface.
The bag that the SIMM is packed in makes a good antistatic surface.
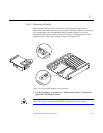
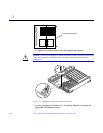
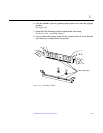
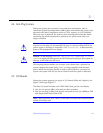
3. Press down on the ejector levers at both ends of the SIMM connector slot
that will receive the new SIMM.
The connector slot will not accept the SIMM unless the levers are in the
insert position. See Figure 3-15.
4. Align the SIMM with the slot.
Hold the SIMM by its edges and orient it so that the two notches at the
bottom of the SIMM line up with the two tabs in the SIMM connector. See
Figure 3-15.
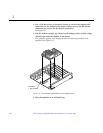
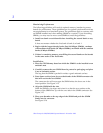
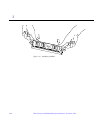
5. Place your thumbs on the top edge of the SIMM and push the SIMM
firmly into its connector.
See Figure 3-16.