


6-16 CHAPTER 6: DIAGNOSTICS AND TROUBLESHOOTING
Constructing Loopback Plugs
To run the external loopback test, you must first insert a
loopback plug into the cable connectors of the 3C975 ATMLink
NIC. The following instructions describe how to construct a
loopback plug for the 3C975-F and the 3C975-UTP ATMLink
NICs.
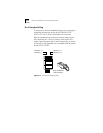
Fiber-Optic Loopback Plug
The loopback plug lets the ATMLink NIC to transmit and
receive on a closed loop. A fiber-optic loopback plug for the
3C975-F NIC may be constructed from a single strand or a
double strand of standard fiber-optic cable.
To construct a loopback plug from a single strand of fiber-optic
cable, insert the male connectors at both ends of the cable
into the female connectors on the NIC.
To construct a loopback plug from a double-strand fiber-optic
cable, uncouple the connectors at both ends of the cable, and
insert the two male connectors of one of the strands into the
connector ports on the NIC. A double-strand fiber-optic cable
has writing on one of the strands in the pair, but not on the
other.
The following procedure for creating a loopback plug from a
common type of double-strand cable is provided for your
reference. The way the connectors clip together may vary
with the manufacturer.
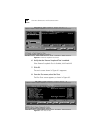
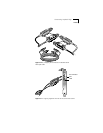
1 Unclip the connectors at both ends of the double-strand
cable, as shown in Figure 6-10.
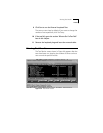
2 Clip together the connectors of one of the strands (one
strand has markings on it, the other does not), as shown
in Figure 6-11.
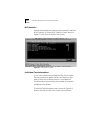
3 Insert the connectors into the SC connector ports of the
3C975-F ATMLink NIC.