


Installation
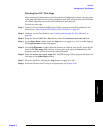
Defining a Frequency Plan
Chapter 2
O:\Manuals\E6385A_Amps\Book\install.fm
48
Step 4. Once the entries match the site configuration, save the file in an ASCII format using the
extension .txt (for example: CS200.txt).
Step 5. If you wish to define plans for more than one site, repeat step 2 through step 4 until
plans for all sites have been created and saved.
Step 6. Exit the editing program.
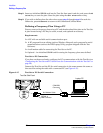
Send the Plan to the Test Set
Once you have connected the Test Set to the PC via the serial port and defined and saved
a frequency plan, you may send the plan to the Test Set. The following procedure uses
the BTS Laptop Utility program (shipped with the Test Software) to perform this
function.
NOTE If you elect not to use the BTS Laptop Utility, refer to the documentation for the PC
communication program for details on setting up serial communications, opening files,
and transferring data.
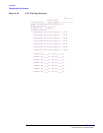
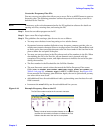
Step 1. From the Lucent AMPS Test Main Menu, select the Calibration/Utilities field. The
Test Software will display the Calibration/Utilities Menu screen.
Step 2. Select the Define Frequency Plan field. The Test Software will display the Define
Frequency Plan screen.
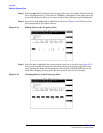
Step 3. Select the PC Download field. The Test Software will display the screen shown in Figure
2-19 to indicate that it is ready to receive the frequency plan.
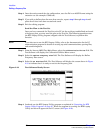
Figure 2-19 Test Software Ready Screen
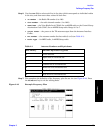
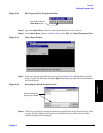
Step 4. Load and run the BTS Laptop Utility program as explained in “Operating the BTS
Laptop Utility Program” on page 27. When the program is running, the BTS Laptop
Utility tool bar will appear on the PC screen (see Figure 2-20).