


Performing Tests
Return Loss Measurement
Chapter 4
O:\Manuals\E6385A_Amps\Book\perftst.fm
94
Step 4. Scroll to the Loss Measurement Type field and press the knob to toggle the setting to
Swept or Discrete.
If you select Swept, the Test Software will measure the loss over the frequency range
that you specify. The following four fields will appear below. In each instance, either
enter the number by turning the knob to the desired value and pressing it, or enter the
number using the DATA ENTRY keys, then either press the knob or the
Enter key to
select it.
• Start Frequency [MHz] – Enter the start frequency.
• Stop Frequency [MHz] – Enter the stop frequency.
• Maximum Expected Loss [dB] – Enter the loss for the device being tested. The Test
Software will use this value to adjust the scale on the results plot. Use a value
slightly greater than expected for the best display resolution.
• Duplex Out Level [dBm] – Enter the setting for the appropriate level into the
device being tested. This may be adjusted if necessary.
If you select Discrete, the Test Software will measure the loss at the frequency that you
specify by entering the Channel Number to be tested. The Channel Number field will
appear below. Enter the number by turning the knob to the desired value and pressing
the knob, or use the DATA ENTRY keys to enter the number and then either press the
knob or the
Enter key to select it.
Step 5. Press the
k1 (Run) key.
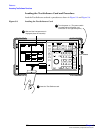
Step 6. Follow the on-screen prompts to connect the 6-dB pads, cables, and the SWR bridge.
Step 7. Press the
k1(Proceed) key.
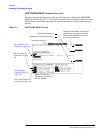
Step 8. The Test Software will turn on the source and make a reference measurement and
display a connection diagram. Follow the on-screen prompts to connect the DUT
(Device-Under-Test).
Step 9. Press the
k1(Proceed) key to perform the measurement.
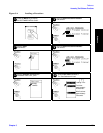
Review the Results
If you have selected a discrete measurement, the Test Software will display the VSWR
and the return loss as a single numeric value (in units of dB).
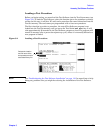
If you have selected a swept measurement, the Test Software will display the loss as a
spectrum analyzer plot of loss versus frequency.
If you wish to record the spectrum analyzer plot of the results of a swept measurement,
press the
k5 (Scr Dump) key. This will cause the Test Software to pause automated
operation to print a summary of the plot. Press the
Print key to send the plot to a PC
connected to the Test Set. After the summary has printed in the BTS Laptop Utility
program Test Set Screen Capture window, press the
k2 (Continue) key to re-start the
Test Software at the point at which it paused. You may save the window contents to a file
in the PC.
Press the
k1 (Proceed) key to display the frequency range settings, the maximum and
minimum return losses, and the maximum and minimum VSWR for the test. From this
point, you may press the
k1 (Repeat) key to test another cable or device, press the
k5 (Return) key once to return to the Insertion Loss Test setup menu, or press the
k5 (Return) key twice to return to the Calibration/Utilities Menu.