


12
Key Concepts
continued
Configuring
PowerChute
plus
for simple
signaling
To configure PowerChute plus for simple signaling. Use
either
one
of these procedures. Note that steps 4–8 are com-
mon to both procedures.
1 (Re)install PowerChute plus. When the installation
program prompts for the UPS Type, select “Back-
UPS” and continue with the installation, including
a reboot of the system.
2 Run PowerChute plus and connect to the UPS.
3 Verify that the status line on the PowerChute plus
screen shows “On Line.” Proceed with step 4.
OR
1 With PowerChute plus running, select
Communi-
cation Parameters
from the
Configuration
menu.
2Click
Simple Signalling
. Click
OK
.
3 Close PowerChute plus.
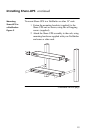
4 If the UPS had previously been connected using
smart signaling:
a Unplug the UPS.
b Turn off the UPS output by pressing the Off
button for at least 5 seconds.
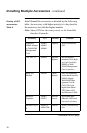
c Change communication cables, using the sim-
ple signaling cable from the interface kit. (See
“Choosing simple signaling cables: Table 1” on
page 4.)
5 Restart PowerChute plus and attach the server to
the UPS.
6 Verify that the status of the UPS on the
PowerChute plus screen shows “On Line.”
7 Simulate a utility power failure.
8 Confirm that the On Batt LED of Share-UPS is on,
indicating that Share-UPS is sending an On Bat-
tery signal to the server. See “LEDs: Table 2” on
page 8.
Continued on next page