


15
Chapter 2 Setting Up Share-UPS
Installing Multiple Accessories
Introduction
If your UPS configuration uses more than one APC acces-
sory, you must install them in the correct order for them to
work together properly. Connect the Share-UPS unit to the
Computer Interface port of the UPS, installing only a Mea-
sure-UPS
II
device in a SmartSlot accessor
y
slot of the UPS.
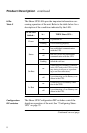
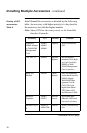
Install all accessories according to priority, referring to “Pri-
ority of APC accessories: Table 4,” on page 16.
Note: SmartSlot accessories fit into APC UPSs and acces-
sories equipped with a SmartSlot accessory slot.
External accessories connect to the Computer Inter-
face port of the UPS or to the Advanced port of other
APC accessories (including Share-UPS).
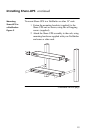
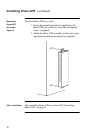
Multiple
Share-UPS units
If you need more than the eight ports available with
Share-UPS, you can daisy-chain up to 5 Share-UPS units
together, provided that the total number of accessories
(including Share-UPS units and APC’s PowerView™) does
not exceed 10.
Note: When daisy-chaining Share-UPS units, you may need
to use a power adapter (see “Optional Power input,”
on page 9). You may also need to lengthen the timeout
delay in PowerChute plus by editing the [ ups ] sec-
tion of
pwrchute.ini
to include “TimeoutFactor = 100”
(or greater) to keep the software from interrupting the
daisy chain’s communications.
Each added Share-UPS unit provides seven more Basic
ports. Only one Advanced port in the daisy chain is avail-
able for connection to the master server. For connection
instructions, see step 2 of “Connection procedure” on page
21.
Continued on next page