


6
CHAPTER
2
Installation
The APC KVM switch requires connectivity to a computer running Network Access Software. Use
Network Access Software to view and control target devices (one at a time) attached to the KVM
switch. The analog port does not require the Network Access Software for operation. The analog
port uses the OSD graphical user interface. For more information, see
Basic Operations on page 16
and Network Access Software on page 35.
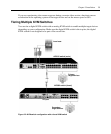
The KVM switch transmits KVM information between operators and target devices attached to the
KVM switch over a network using either an Ethernet or local connection.
The KVM switch uses TCP/IP for communication over Ethernet. Although 10BASE-T Ethernet
can be used, using a dedicated, switched 100BASE-T network or a 1000BASE-T network will
improve performance.
Installing And Setting Up The KVM Switch
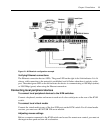
Connecting the KVM switch
To connect and turn on the KVM switch:
1. Turn off target devices that are part of the switching system. Connect one end of the power
cord to the rear of the KVM switch and connect the other end to an AC power source.
2. Connect a VGA monitor and either PS/2 or USB keyboard and mouse cables into the labeled
KVM switch ports. You must install both a keyboard and mouse on the local ports or the
keyboard will not initialize correctly. You cannot connect a DVI or EGA monitor to the KVM
switch.
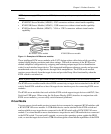
3. Connect one end of a CAT5 patch cable into a target device interface port and connect the other
end into the RJ-45 connector of a KVM server module. Plug one end of a CAT5 patch cable
into the KVM server module port and plug the other end into the RJ-45 connector of a KVM
server module.
4. Connect the KVM server module into the correct ports on the rear of the target device. Repeat
this procedure for all target devices to be connected to the KVM switch.
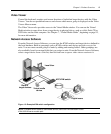
5. Connect a CAT5 patch cable from the Ethernet network into the LAN port on the rear of the
KVM switch. Network users will access the KVM switch through this port.