


Chapter 4: Network Access Software 44
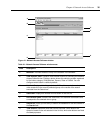
2. Click the Telnet tab.
3. Specify the server’s IP address and enable the Use Default checkbox. The port number is 23,
by default; you may specify another value.
4. Click OK to save the changes.
Launching The VNC Or RDP Viewer
Network Access Software supports a user-defined Virtual Network Computing (VNC) and Remote
Desktop Protocol (RDP) viewer. To launch either the VNC or RDP viewer, select the Server tab
from the Network Access Software. Select a server from the units list, then click on either the VNC
or RDP button at the bottom right of the screen.
Customizing Properties
The Properties window in the Network Access Software contains the following tabs: General,
Network, Information and, if the selected unit is a network-enabled device, Connections. Use these
tabs to view and change properties for the selected unit.
You may alter certain properties of individual KVM switches and servers using the Network
Access Software. The Properties dialog box in the Network Access Software contains five tabs:
General, Network, Information, Connections and Telnet.
General properties
General properties describe the unit and its location. You may specify a unit’s Name, Type (server
only), Icon, Site, Department and Location. Network properties include the KVM switch’s address
and, for digital KVM switches, the URL to be used when establishing a browser connection. When
this field contains a value, the Browse button appears in the Network Access Software task bar.
For a server, network properties specify the URL to use when establishing a browser connection to
the server. When this field contains a value, the Browse button appears in the Network Access
Software task bar.
To view or change general properties:
1. Select a unit in the Unit list.
Select View > Properties from the Network Access Software menu.
— or —
Click the Properties button.
— or —
Right-click on the unit. Select Properties from the pop-up menu.
The General Properties window opens.