


128 Chapter 8 Administering Client Computers
Emptying the Trash
Apple Remote Desktop allows you to empty the Trash on clients to free up disk space.
To find out how much free disk space is on a computer, create a System Overview or
Storage report using the Report menu.
As a part of routine maintenance for client computers, you can free disk space by
emptying the Trash. Emptying the Trash completely removes any items you’ve
previously deleted on the client. You can use the System Overview report to see how
much disk space you can recover by emptying the Trash.
To empty the Trash:
1 Select a computer list in the Remote Desktop window.
2 Select one or more computers in the selected computer list.
3 Choose Manage > Empty Trash.
4 Click Empty.
Setting the Startup Disk
Apple Remote Desktop can set the startup disk on any client computer. You can choose
between a volume on a local hard disk or any available NetBoot volume.
The startup disk must have a valid operating system installed on it. To set the startup
volume on a local hard disk for multiple computers at once, the local volume name
must be the same for all computers.
Alternatively, you can set the startup disk to be a NetBoot volume provided by
Mac OS X Server. This allows you to start up a number of clients from a NetBoot server.
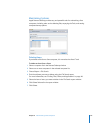
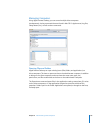
To set the startup disk:
1 Select a computer list in the Remote Desktop window.
2 Select one or more computers in the selected computer list.
3 Choose Manage > Set Startup Disk.
The list that appears shows the client’s local hard disk, a custom NetBoot server item,
and a list of all available NetBoot and Network Install servers available on the local
network subnet.
4 Choose the client’s local hard disk or a NetBoot server volume.
5 If you want to choose a specific local hard disk volume, select Hard Disk, click Edit, and
enter the desired volume name.
6 If you want to choose a custom NetBoot server volume, enter the server IP address or
fully qualified domain name, and the NetBoot volume name.
7 If desired, select Restart When Done.