


12
5250 REMOTE EMULATOR CARD
WARNUNG!
Vergewisseren Sie sich, dass die PC ausgeschaltet und die
Netzzuleitung entfernt ist bevor irgendwelche Kabel angeschlossen
werden. Schalten Sie Gerät nicht wieder ein bevor alle Kabel
angeschlossen sind. Zur vollständigen Trennung vom Netz ist der
Netzstecker zu ziehen.
2. Disconnect the PC from its monitor and remove the PC’s cover.
Locate an empty expansion slot and remove the slot’s cover (but keep
the slot cover’s screw close by). Touch a grounded surface, other than
the PC’s chassis to dissipate any static charge you might have built up,
then carefully remove the 5250 Remote Emulator Card from its anti-
static bag.
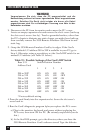
3. Grasp the 5250 Remote Emulator Card by its edges. If the Card’s
factory-default I/O address 300 to 30F is available in your PC, go to
Step 4. Otherwise, using a screwdriver, set the Card’s DIP switch for an
unused I/O address (see Table 2-1 below).
Table 2-1. Possible Settings of the Card’s DIP Switch
Base I/O Switch-Position Number
Address Used
1234
300 to 30F* ON ON ON ON
310 to 31F ON ON ON OFF
320 to 32F ON ON OFF ON
340 to 34F ON OFF ON ON
350 to 35F ON OFF ON OFF
360 to 36F ON OFF OFF ON
380 to 38F OFF ON ON ON
3A0 to 3AF OFF ON OFF ON
* Factory-default setting
4.Press the card firmly into the expansion slot. Screw the slot cover’s
screw back in.
5.Run the Card’s diagnostic program before you replace the PC’s cover:
a) Plug in the monitor, keyboard, and power without replacing the
PC’s cover, then turn ON the PC. (Be extremely careful while you do
this.)
b) At the first DOS prompt, go to the directory where you have the
5250 Remote Emulator Card’s software stored: Type the diskette-