


INTEGRUS | Installation and User Instructions | Integrus Radiators en | 43
Bosch Security Systems | 2005-04 | 3122 475 22015en
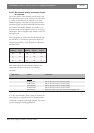
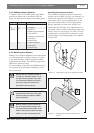
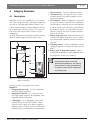
3.1.2 Radiator status indication
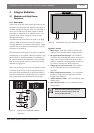
A radiator consists of two IRED panels. Each IRED
panel has an amber and a red indicator LED (see
figure 3.2) which show the status of the radiator panel
Red LED Amber LED Status
on off Stand-by mode
off on Transmitting
flashing on At switch-on:
Initialising signal equalisation
During operation:
Temperature protection mode.
See chapter 6,
Trouble-shooting
on on IRED panel failure.
See chapter 6,
Trouble-shooting
3.1.3 Mounting the radiators
Radiators in permanent installations can be either fixed
to a wall, hung under a ceiling or balcony or secured
to any sturdy material, using the suspension bracket
supplied with the radiator. The mounting angle can be
adjusted for optimal coverage.
For wall mounting a separate bracket (LBB 3414/00) is
also required. In non-permanent installations, a floor
stand can be used.
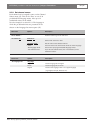
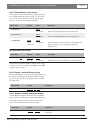
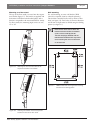
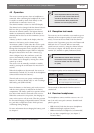
Attaching the suspension bracket
First assemble the supplied suspension bracket and
connect it to the radiator (see figure 3.3 and figure 3.4).
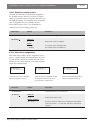
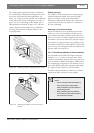
This bracket is attached to the radiator by two bolts
with washers. There are corresponding holes on the
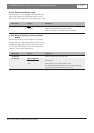
back of the radiators. There is also a spring-loaded
plunger (indicated by a black arrow in figure 3.4),
located above the bolt hole on the right-hand arm of
the bracket, which is used for adjusting the angle of the
radiator (shown in inset in figure 3.4). There are corre-
sponding holes on the back of the radiator for accept-
ing this plunger. The mounting angle can be adjusted
in steps of 15°.
Note: When in operation, the radiators
may feel warm to the touch. This is quite
normal, and does not indicate a radiator
fault or malfunction.
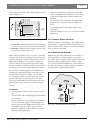
Warning: Always ensure that natural air-
flow is not obstructed by ceilings, walls
etc. when determining the position of the
radiator. Leave plenty of space around the
radiator to prevent it becoming too hot.
Figure 3.3 Attaching the plate to the suspension bracket
Figure 3.4 Attaching the suspension bracket to the
radiator
Warning: When you install the radiator in
a ceiling, you must leave at least 1 m
3
of
free space around the back of the radia-
tor. To prevent the radiator from becom-
ing too hot, make sure that there is a
good airflow in this free space.