


INTEGRUS | Installation and User Instructions | Integrus Radiators en | 45
Bosch Security Systems | 2005-04 | 3122 475 22015en
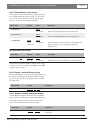
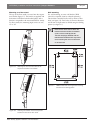
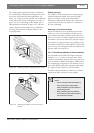
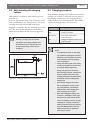
The radiator (plus suspension bracket) is attached to
the wall bracket by sliding the mounting bolt over the
slot on the wall bracket and then tightening it (see
figure 3.9). A split pin is then inserted into a small hole
in the bolt to stop it from working loose (see inset in
figure 3.9). The vertical angle of the radiator can be
adjusted between 0 and 90° in steps of 15°. The hori-
zontal orientation of the radiator can be adjusted by
loosening the bolt then turning the radiator to the
required position.
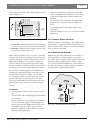
Ceiling mounting
The radiators can be attached to the ceiling using the
supplied suspension bracket. This ensures enough
space for a proper air flow around the radiator.
Mounting a radiator in the ceiling will in most cases
require a forced air flow by means of a ventilator to
prevent overheating.
Mounting on horizontal surfaces
When the radiator has to be positioned a horizontal
surface (e.g. on top of an interpreter booth), the dis-
tance between the radiator and the surface must be at
least 4 cm (1.5 inch) to enable enough air flow around
the radiator. This can be achieved by using the suspen-
sion bracket as a support. If this is not possible, switch
the radiator to half power. If the radiator is used at full
power on top of an interpreter booth, the ambient tem-
perature must not exceed 35° C.
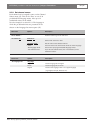
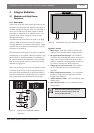
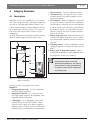
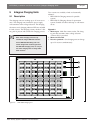
3.1.4 Connecting radiators to the transmitter
The transmitter has six BNC HF Output connectors
labelled 1, 2, 3, 4, 5 and 6 on the rear panel. All six
outputs are functionally identical. They can each drive
up to 30 radiators (LBB 4511/00 and/or LBB 4512/00)
in a loop-through configuration. The radiators are con-
nected with RG59 cables. The maximum cable length
per output is 900 m (2970 ft) to the last radiator.
Automatic cable termination is achieved by a built-in
switch in the BNC connectors on the radiator.
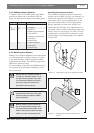
Figure 3.8 Attaching the wall mounting bracket to a wall
Figure 3.9 Attaching the radiator to the wall mounting
bracket
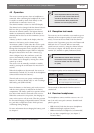
Notes:
• For the automatic cable termination to
work, never leave an open-ended
cable connected to the last radiator in
a loop-through chain.
• When connecting infra-red radiators,
do not split the cable, else the system
will not function correctly.