


2-11
User Guide for Internetwork Performance Monitor
OL-11291-01
Chapter 2 Getting Started With IPM
Configuring the IPM Components
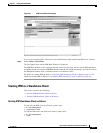
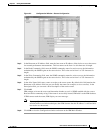
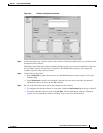
Step 3 In the Target Type field, select the protocol type to be used with this target. The possible values are:
• IP—Any IP-addressable device. Requires a destination IP address or host name.
• Cisco SAA Responder—Component embedded in a target Cisco device running version 12.1 or later
of the Cisco IOS software. Its function is to respond to SA Agent request packets from a source
router running the SA Agent software.
This target type is required for Enhanced UDP operations measuring jitter, or if the target uses the
SA Agent (to avoid potential connection problems).
You must enable the SA Agent Responder at the router using the rtr responder configuration
command.
• SNA—SNA LU Type 0 or Type 2 connection to Cisco’s NSPECHO mainframe host application, or
SNA SCCP-LU Native Echo. Requires the PU name defined for the SNA PU connection to VTAM.
NSPECHO must be installed on the VTAM mainframe to be used as the target. The NSPECHO
application is provided on the IPM product CD. For information about installing NSPECHO, see the
“Installing NSPECHO to Measure SNA Response Times” chapter of the Installation Guide for
Internetwork Performance Monitor.
Step 4 Based on the protocol type you selected, take one of the following actions:
• If you selected IP, enter the host name or IP address of the target device in the Hostname or IP
Address field.
• If you selected Cisco SAA Responder, enter the host name or IP address of the target device in the
Hostname or IP Address field. In the Read Community field, enter the SNMP community name for
read access to the information maintained by the SNMP agent on the target device. This is an
optional field. If you enter the Read Community String, IPM will verify the SAA responder status
on the target device.
• If you selected SNA, enter the SNA host name of the target device in the PU Name field.
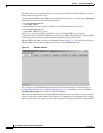
Step 5 In the Alias Name field, enter a name to assign to the target. By default, this field matches the Hostname,
IP Address, or PU Name field, but you can modify the name (for example, to use as an alias). In the
Description field, you can enter a brief description of the target.
Step 6 Click Add.
IPM adds the newly defined target to the IPM database.
If you specify an IP address instead of a host name, and that IP address cannot be resolved by standard
address resolution techniques, then IPM assumes that the IP address is valid and does not resolve to a
host name.
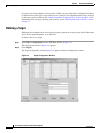
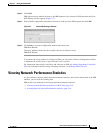
Step 7 Click OK to close the Configuration window and return to the IPM Main Window.
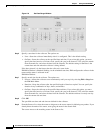
If you must add a large number of targets to IPM, you can use the Target Configuration window to add
them one-by-one, but it is more efficient to use a seed file.
For information about using a seed file to add targets to IPM, see t Adding Components Using Seed Files.
For information about viewing or deleting targets, see Working With Target Devices.