


D-Link DES-3250TG Standalone Layer 2 Switch
Keep in mind the following important considerations for stacked Switch groups:
All management of the Switches in the stack is done through the master Switch. •
• The master Switch should be used to uplink to the Ethernet backbone.
For DES-3250TG stacks, the master Switch can be chosen automatically as each Switch in a connected stack competes for
status. However, you can choose a specific device and force it to operate as the master. Use the CLI command
config
stacking mode enabled master
for the selected Switch; leave the remaining Switches in the default auto-
stacking mode.
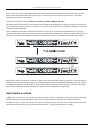
For DES-3250TG stacks, if the link between any two Switches fails or is disconnected, or if any Switch in a stacked group
fails, all of the Switches in the stack will automatically reboot. Since the stack is connected as a ring, the stack will need to be
connected to work around the failed link. Change the cabling to bypass the failed link and allow the stack to reboot. The
Switches will negotiate again since the composition of the stack has been altered. Read below for more information about
changes in stacked Switch groups.
A Switch stack has a single IP address − if the stacking link to a given Switch fails or is disconnected, that Switch will loose its
status in the stack and reboot as a standalone device with the IP settings it had before becoming a member of the Switch stack.
NOTE: For Release 4 the DES-3250TG maintains two separate configurations, one for standalone
operation and another for stacked operation. Each configuration has identical IP settings, VLANs, link
aggregation, QoS, etc. This dual system allows a Switch to change status from standalone to
stacking enabled and keep its configuration settings.
Changes to Switch Stack Structure
If Switches are added to or taken out of a stacked group of DES-3250TG Switches it is necessary to change the composition of
a Switch stack and rearrange the stacking connections. If a stacking link fails or if a member of a stacked group fails, the
composition of the stack will necessarily change also. In such a case intervention is required to at least reconnect the stacking
cable to bypass the failure. In addition to making changes to the cable links connecting the Switches in the stack, it may be
necessary or desirable to change the stacking mode configuration of one or more units. A few examples presented below to
help make the changes to cable connections for DES-3250TG stacks and if necessary, to Switch stacking mode configuration
settings.
NOTE: For a Switch that has already been configured with many settings already in place, it is a good
idea to save the configuration files to a server before changing the stacking mode status.
Configuration files can be saved using the CLI, SNMP manager or web manager interface.
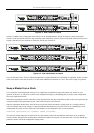
Convert a Standalone Switch to a Stacked Switch
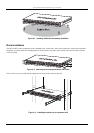
A Switch that has previously acted in a standalone capacity may become a member of a stacked group simply by installing a
stacking module and connecting it to a connected Switch stack. For this example, let’s assume Switch A has been setup as a
standalone device and has been functioning on the network. We want to join this Switch with another DES-3250TG, Switch B,
to form a 2-Switch stack. Many configuration settings including IP settings have already been set on Switch A so we will keep
these and use them for the new stacked arrangement. Switch A is also uplinked to the backbone via the GBIC port in the
stacking module. Switch A will stay in its position in the uppermost slot in the rack and all network connections will remain in
place.
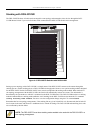
First, save the configuration files to a TFTP server so they may be reloaded if any problems occur. This should be done
whether or not stacking mode is changed.
13