


Stackable NWay Ethernet Switch User’s Guide
40 Using the Console Interface
6
6 U
SING THE
C
ONSOLE
I
NTERFACE
Your Stackable NWay Ethernet Switch supports a console management interface that allows you to set up
and control your Switch, either with an ordinary terminal (or terminal emulator), or over the network using
the TCP/IP
Telnet
protocol. You can use this facility to perform many basic network management functions. In
addition, the console program will allow you to set up the Switch for management using an SNMP-based
network management system. This chapter describes how to use the console interface to access the Switch,
change its settings, and monitor its operation.
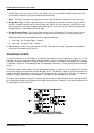
Setting Up A Console
First-time configuration must be carried out through a “console,” that is, either (a) a VT100-type serial data
terminal, or (b) a computer running communications software set to emulate a VT100. The console must be
connected to the Diagnostics port. This is an RS-232 port with a 9-socket D-shell connector and DCE-type
wiring. Make the connection as follows:
1. Obtain suitable cabling for the connection.
You can use either (a) a “null-modem” RS-232 cable or (b) an ordinary RS-232 cable and a null-modem
adapter. One end of the cable (or cable/adapter combination) must have a 9-pin D-shell connector suitable
for the Diagnostics port; the other end must have a connector suitable for the console’s serial
communications port.
2. Power down the devices, attach the cable (or cable/adapter combination) to the correct ports, and restore
power.
3. Set the console to use the following communication parameters for your terminal:
♦
9600 baud
♦
No parity checking (sometimes referred to as “no parity”)
♦
8 data bits (sometimes called a “word length” of 8 bits)
♦
1 stop bit (sometimes referred to as a 1-bit stop interval)
♦
VT-100/ANSI compatible
♦
Arrow keys enabled
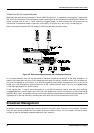
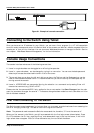
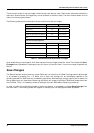
A typical console connection is illustrated below: