94 Maintenance
Note
: You need not remove paper to change the ribbon cartridge.
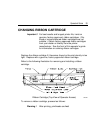
1. Turn off the printer or place printer off line.
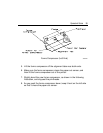
2. Open the operator access door.
3. Move the printhead carriage to the center of the printer.
4. Move the printhead gap adjustment lever as far as possible toward the
front of the printer to open the gap as wide as possible between the
platen and printheads.
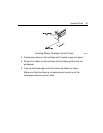
5. Pull up all of the ribbon guides to remove them from their printheads.
6. Lift the cartridge straight up and out of the printer.
To install a ribbon cartridge, proceed as follows:
Note
: Replacement ribbon cartridges include three ribbon guides. The
three ribbon guides are only loosely attached to the ribbon. If a
ribbon guide has come off the ribbon, see "The Clean Way to Re-
attach a Ribbon Guide," (Page 103).
1. Move the ribbon guides toward the center of the ribbon, and make
sure the ribbon is taut.
If necessary, turn the ribbon feed wheel in the direction of the arrow
until the ribbon is taut.
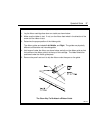
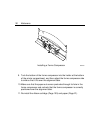
2. Insert the ribbon cartridge into the printer so that the tabs on the right
and left ends of the ribbon cartridge slip through the slots provided in
the operator access way. Guide the tabs into the retaining slots
provided at each end of the printer mechanism.


