Operator's Guide 101
CHANGING FUSES
Caution !
Double pole/neutral fusing.
The printer contains two fuses in a compartment just above the power
receptacle near the left-rear corner of the printer.
If a fuse "blows," turn off power and unplug the power cord. Attempt to
find the cause of the blown fuse before putting in a new fuse or fuses.
To change a fuse, proceed as follows:
1. Note the voltage selection in the window of the fuse compartment.
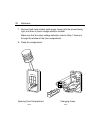
2. Use a small, flat-blade screwdriver to open fuse compartment, as
shown in the illustration on Page 109.
3. Pull out voltage selection tumbler.
4. Pull out fuse holder(s).
5. Check blown fuse(s).
Note
: If one or both fuses are shattered, this indicates a short circuit in
the printer receptacle or in the printer's primary power supply. If a
fuse is shattered, do not attempt to replace the fuse; simply unplug
the printer and call one of the numbers listed in the front of this
operator's guide to obtain qualified servicing.
6. Obtain new fuse(s):
•
For 100 or 120 Vac, use two, 3.00 a., slow-blow fuses (1¼ in. x ¼
in.), rated at 250 v.
•
For 220 or 240 Vac, use two, 1.6 a., time-delay fuses (5 mm x 20
mm), rated at 250 v.


