


Using Floppy Diskettes
A-6
Installing Status Monitor 2
EPSON Status Monitor 2 is a single utility that you install on
your computer in two parts. For each system that will monitor
the printer, make sure you install the network part and the
EPSON Stylus COLOR 850 part of EPSON Status Monitor 2.
Follow these steps to install EPSON Status Monitor 2:
1. Insert Status Monitor 2 for Network, diskette 1 in your
drive.
2. Click
Start
, then click
Run
.
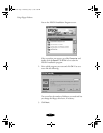
3. Type
A:\SETUP and click OK.
4. Close any open programs and click
Next. A screen appears
asking where you want to install Status Monitor 2.
5. Click
Next to accept the default directory or choose a
different directory and click
Next.
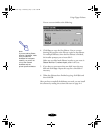
6. If you are using Windows 95 and you have TCP/IP
installed, you see a screen asking you if you want to enable
EPSON TCP/IP printing. Select
Yes
if you want to print
with TCP/IP, and then click
Next
. If you are printing with
Novell NetWare, select
No
.
TCP/IP Printing: Yes_______ No_______
7. Select the type of printer(s) you want to monitor and click
Next.
Monitor:
EPSON TCP/IP printers_______ NetWare
printers_______ local printers_______
8. Select
Monitor
to monitor EPSON network printers that
do not have drivers installed in your computer. Select
Do
not monitor
if network traffic is a problem. Then click
Next.
Printers: Monitor_______ Do not monitor_______
Note:
You may not see screens
for all the steps here,
depending on your
computer’s configuration.
If you are using Windows
95 on a peer-to-peer
network, make sure you
have TCP/IP installed on
your system before
installing Status Monitor 2
so you can enable EPSON
TCP/IP printing.
Write down your settings
in the spaces provided as
you install the first part of
Status Monitor 2. You
need to select the same
settings for the second
part.
basket-a.fm Page 6 Wednesday, May 13, 1998 4:09 PM