


RESTRICTED USE ONLY Fargo Electronics, Inc.
DTC400 Card Printer/Encoder User Guide (Rev. 2.6)
6-57
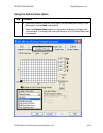
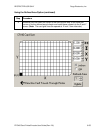
Using the Defined Area Option (continued)
Step Procedure
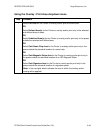
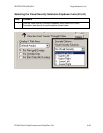
6 a. Determine whether to use the Front option (via the Front radio button) or the
Back option (via the Back radio button).
b. Use the Defined Area arrows to navigate back and forth from area to area in
the Front or Back area. (Note: The active area will always be highlighted
with a dotted outline.)
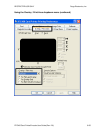
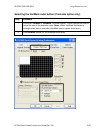
c. Define another area by clicking on the Defined Area UP arrow.
• Another .2" x .2" / 5mm x 5mm area will appear in the lower left-hand
corner. (Note: This is the location in which all newly defined areas will
first appear.)
• Up to 5 areas can be defined; however, additional areas cannot be added
until the most recently created area has been moved or sized. (Note: For
this reason, size and position each area as it is created.)
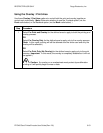
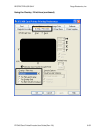
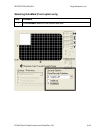
d. Delete an area by using the Defined Area arrows to select the area and click
Delete. (Note: If all areas are deleted, the K Panel Resin options will
automatically be deselected.)