


Secure Perfect 6.1.1 User Manual 57
6. Select the input device you will be using and click OK. The next time you capture a photo, the
program will use the input device you selected.
7. Repeat these steps to set up an input device for signature pads. The program will recognize a
separate input device for photos and signatures.
To select a record and capture a NEW image for the selected record:
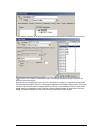
1. Select Person from the Personnel menu.
2. Select the Photo tab on the Person Form.
3. Select ONE of the records in the Record List.
4. Click Capture Image/Signature to capture a new image. Based on the input device you previously
selected, the proper interface window will come up for adjusting, capturing, and loading a new
image.
5. Adjust, then save the adjusted settings.
6. Click Capture Photo to capture the new image. Once the photo is taken, the Image Enhancement
dialog box will display.
7. The dialog box that displays allows you to crop and enhance the newly captured image. You will
notice that a highlighting box with eight sizing handles is placed directly over the center of the
Original Image.
8. Place your mouse pointer over the image. The pointer will change from a single arrow to a four-
headed arrow. This allows you to move the cropping area across the newly acquired image.
9. At this point, you can either capture a different portion of the image "as is," or adjust the highlighting
box to capture some or all of the image.
Refer to the Image Capture Application Help system for additional specific details of this application.
To crop an image:
1. Place your mouse pointer within the highlighting box’s cropping area.
2. Press and hold down your left mouse button, and drag (move) the cropping area to the desired
location on the image. Release the left mouse button when you are satisfied with the new location
of the highlighting box.
3. Click OK. The photo can be placed on either the front or the back of your badge design. To print
the photo, your badge design must include photo image keylines. When you print the badge from
the Secure Perfect application, the keylines are replaced by the image.
To resize the crop box:
1. Place your mouse pointer directly over one of the highlighting box handles. The pointer changes
from a four-headed arrow to a two-headed arrow. This allows you to resize the cropping area.
2. Press and hold down your left mouse button, and drag (move) the handle toward the center of the
cropping area. The size of this highlighting box is fixed to the aspect ratio of the image type: 4 x 5
for photos; 5 x 1 for signatures.
3. When the cropping area is sized to your satisfaction, move the highlighting box so that it covers the
portion of the image that you want to capture.
4. Click OK. The Secure Perfect Image Capture Application screen displays with the selected image
in place. To print the photo, your badge design must include photo image keylines. When you print
the badge from the Secure Perfect application, the keylines are replaced by the image. The photo
can be placed on either the front or the back of your badge design.
5. Click OK. The selected image will be moved to the Photo tab of the Person Form.
6. Click Save. The image capture is saved to the database.
Displaying Existing Images
During normal operations, images are not downloaded from the server. In order to view an existing image
for a badge record, the image(s) must be loaded to the computer. On the Person Form, select the Photo
tab, then click Search, and highlight a record from the record list. Click Capture Image/Signature button
to enable the Secure Perfect Image Capture Application screen. Move the mouse pointer to the existing
image and right-click. A shortcut menu for the image will appear. The available image options on that
menu are discussed in the paragraphs that follow.