


Back to TOC Scanning from HP PrecisionScan Pro 47
6HWWLQJSL[HORXWSXWOHYHOV
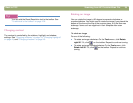
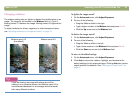
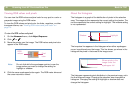
The output levels setting lets you create interesting effects for scanned
pictures. When you select this command, the Black and White output
levels appear. By default, white is set to 255, and black is set to 0.
Decreasing the White output level makes the overall image darker.
Increasing the Black output level makes the image more faded.
Changing the White output level value to 0 and the Black output level
value to 255 inverts the colors in the image.
To change the ranges for the numbers in the White and Black fields,
see the Controls tab of "Setting preferences" on page 60.
7LS
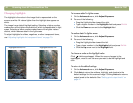
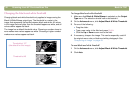
To use an image as a light background for dark text, such
as for an overhead transparency, increase the Black
output level until the image is as faint as you want.
To use an image as a dark background for light text, such
as for color slides, decrease the White output level value
until the image is as dark as you want.
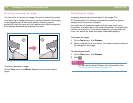
7RFKDQJHRXWSXWOHYHOV
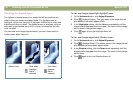
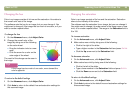
1 On the Advanced menu, click Adjust Exposure.
2 Click the Output Levels check box. The dialog box expands to
display the current White and Black output levels.
3 To change the levels, do one of the following:
● Click on the line at one side of a slider.
● Type a different number in the White or Black field and press
E
NTER.
● Click the Up or Down arrow next to the White field or Black
field.
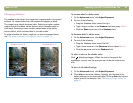
The result of the changes to output levels can be seen in the preview
area.
7RUHWXUQWRWKHGHIDXOWVHWWLQJV
1 On the Advanced menu, click Adjust Exposure.
2 Click Auto to return the midtone, highlight, shadow, and output
levels to the default settings for this scanned image.