


3 Using Your Laptop
36 SA200
Using the Floppy Disk Drive
Your laptop features a high-density 3.5 inch, removable floppy
disk drive. This drive is designated drive “A” by your laptop’s
operating system and is housed in the laptop’s peripheral bay. See
Figure 2 on page 6. See “Exchanging the Peripheral Bay Modules”
beginning on page 54 for detailed information on removing your
floppy disk drive and replacing it with the
CD-ROM module.
About Floppy Disks
Your computer’s floppy disk drive accepts both 720KB double-
density (DD) floppy disks and 1.44MB high-density(HD) floppy
disks, but 2.88MB (High Density) disks are not supported. Floppy
disks are sometimes labeled by manufacturers as double density
1.0MB and high density 2.0MB floppy disks. These labels,
however, indicate the unformatted capacities of the floppy disks.
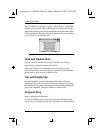
Formatting Floppy Disks
Sometimes you must format a new floppy disk before you can use
it. To format a floppy disk using Windows 95:
1.
Insert a new floppy disk into the floppy disk drive.
2.
Double-click on the My Computer icon.
3.
Click on Floppy [A:].
4.
From the File menu, click on Format. A dialog box
displays to enable you to select some settings.
5.
Click on Start to begin formatting. After this process is
complete, the floppy disk will be ready to use.
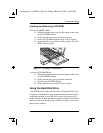
Inserting and Removing Floppy Disks
To insert a 3.5 inch floppy disk into the floppy disk drive, follow
these steps:
1.
Hold the floppy disk with the drive wheel facing down
and the metal shutter end toward the drive.
2.
Insert the floppy disk into the drive slot and gently push
it into the drive.
lonestar.boo : sa200.fm Page 36 Friday, March 6, 1998 10:53 AM