


2-14 Intel® Server RAID Controller U3-1 User’s Manual Rev 1.0
Advanced Installation Steps
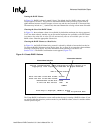
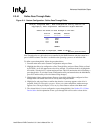
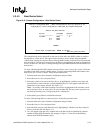
2.3.4.2 Format Disks
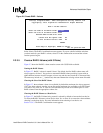
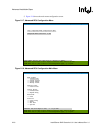
Figure 2-12. Custom Configuration - Format Disks
This feature allows the user to low-level format the selected disk(s). The user must double-confirm
the request before the transaction begins. The user also has the opportunity to cancel the operation
before any action is taken.
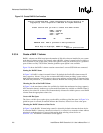
To format a disk, follow the procedure below.
1. From the main menu select Custom Configuration and press Enter.
2. Select Format Disks and press Enter.
3. Select disk(s) to format by highlighting them with the arrow keys and pressing Enter to mark
the disk(s) to be formatted. See Figure 2-12.
4. An X will appear under the Select column next to the disk. Disks are identified by channel #
andthenSCSIID#.
5. Select Submit, press Enter to confirm the selection.
6. Select Yes at the first confirmation prompt, then Yes at the 2nd confirmation prompt to begin
formatting the disk(s). You may cancel your action to format the disk(s) at anytime before
pressing Enter at the 2nd confirmation screen.
7. Once the disk(s) begins to be formatted, a message appears stating the disk(s) is being
formatted. After completion, a message appears confirming the format is complete. Press any
key to return to the Custom Configuration screen.
Intel(R) Integrated RAID - RAID Configuration Utility Version 4.05
Copyright(c) Intel Corporation 1998-2000 All Rights Reserved
Select the disks to format:
Disk ID Size(MB) Select?
------- -------- -------
0:0 4291
0:1 4291
0:2 4291 X
0:3 4291 X
0:4 4291 X
SUBMIT
Arrow Keys to Highlight, ENTER to Select.
Esc for previous menu