


Intel® Server RAID Controller U3-1 User’s Manual Rev 1.0 2-45
Advanced Installation Steps
Note: You must have administrative level permissions to install SRCU31 software. This
procedure assumes that the SRCU31 hardware and Windows NT server are installed and
operational in your system.
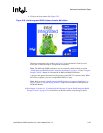
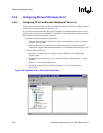
a. Insert the SRCU31 CD-ROM in the CD-ROM drive. If the Software Installation Main
Menu does not appear, then run the setup.exe file that resides at:
<CD-ROM root>\os_setup\winnt\setup.exe on the CD-ROM.
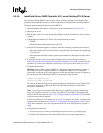
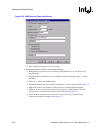
b. Click on the Setup button. See Figure 2-25. Follow the on-screen prompts to complete
installation.
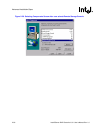
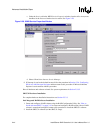
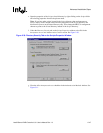
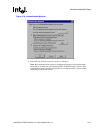
The four components in the window in Figure 2-26 are preselected. Accept this
configuration and click on Next.
Note: The DMI and SNMP components are not selected by default. Refer to section
“Intel® Integrated RAID Software Component Installation” on page 4-3 of the “Using the
Storage Console” chapter for information on DMI and SNMP installation.
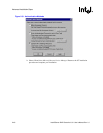
A progress bar appears that measures the progress of the SRCU31 setup. When this screen
completes, you have completed the SRCU31 setup.
Note: Refer to section “Intel® Integrated RAID Software Component Installation” on
page 4-3 of the “Using the Storage Console” chapter for information on HP Openview
and RAID Monitor.
3. See Chapter 4, Section 4.3, “Configuring RAID Volumes Using the Intel® Integrated RAID
Storage Console” on page 4-12 to customize your RAID volumes using Storage Console.