


Intel® Server RAID Controller U3-1 User’s Manual Rev 1.0 2-29
Advanced Installation Steps
2.5.2.6 Install Intel® ServerRAIDControllerU3-1onanExistingNT4.0
Server
This procedure installs SRCU31 into a system with an existing operating system installed. The
procedure ensures that the necessary software components are installed before installing SRCU31.
Follow the required procedure below to install SRCU31.
1. Have all hardware and software on hand. See system requirements in Section 2.5.2.2.
2. Back up your server.
3. Run the latest virus scan on any downloaded diskettes used for installation or on any existing
volumes.
4. Update Microsoft Windows NT Server 4.0 with the following component:
—TCP/IP
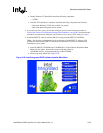
5. After the NT installation update is complete, install the following components and software:
— Microsoft Windows NT 4.0 Service Pack 5 or greater
— Microsoft Internet Explorer 4.00 or greater
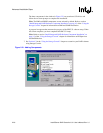
6. If your browser uses a proxy server, then configure your browser using the procedure in
Section B.6, “Browser Configuration During Initial Installation” on page B-5 andreturntothis
procedure. If you have not configured your browser to use a proxy server, then go to step 7.
7. SRCU31 Hardware Installation
The adapter may or may not come with a SDRAM ECC DIMM inserted into the memory
socket. If it does, then the adapter is ready to be installed into the server as the Intel Integrated
RAID software is programmed into the flash memory.
If the SDRAM ECC DIMM is not inserted into the memory socket, then acquire a supported
32, 64 or 128 SDRAM ECC DIMM and insert it into the memory socket of the adapter. See
supported parts at http://support.intel.com/support/motherboards/server/srcu31.
Warning: Shock hazards may be present inside the unit in which this card is being installed.
Disconnect all power cords to the unit before removal of any covers.
Follow the warnings noted in your computers user or service manual before installing this
board. ONLY after all the covers are reinstalled should you reattach the power cords and
power up the unit for the software installation and use.
Note: Take precautions to prevent electrostatic discharge (ESD) damage before handling the
SRCU31 Adapter Card.
a. Power down the system, disconnect power cord(s) and remove the system cover.
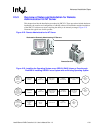
b. Install the SRCU31 into an available PCI slot. Connect one end of the SCSI cable to the
internal (68 pin) or external (VHDCI) SCSI connector on the SRCU31. Connect the other
end of the SCSI cable to the SCSI drives or drive enclosure.
c. Replace the system cover, reconnect power cord(s).