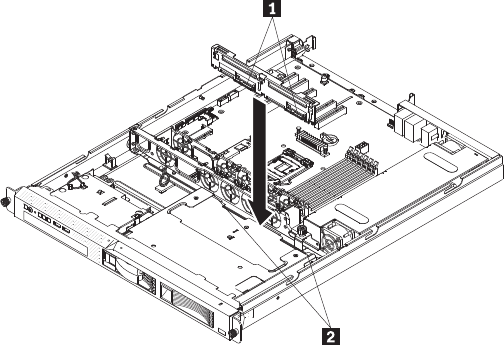
Note: The following illustration shows installing the hot-swap SAS/SATA backplane.
1 Connectors
2 Guide channels
1. Connect the power cable to the replacement backplane or back plate.
2. Reconnect the backplane or back plate cables:
v If the server is a hot-swap model, reconnect the SAS/SATA controller signal cable to the backplane.
v If the server is a simple-swap model that contains a standard SATA back plate, reconnect the SATA
cable to the system board. See “System-board internal connectors” on page 107 for the location of
the SATA connectors on the system board.
Note: Make sure that the cable drive number on the back plate matches the SATA connector
number on the system board.
v If the server is a simple-swap model that contains a SATA RAID back plate, reconnect the SAS
signal cable to the SAS/SATA controller.
3. Slide the backplane or back plate into the card guides, making sure that any nearby wires or cables
are not trapped or pinched.
4. Press firmly until the backplane or back plate is fully seated.
5. Install the hard disk drives.
6. Go to “Completing the FRU replacement” on page 173.
Chapter 6. Replacing FRUs 155
