


C H A P T E R 2
Installing your interactive whiteboardsystem
11 smarttech.com/kb/170510
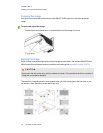
Use the mechanical adjustments described in the installation document and the image alignment
screen to adjust the projected image size, shape and location so that you can see the full projected
image clearly. Don’t use other images, which might be cropped or scaled by the projector and result in
a misleading projected image size, shape, and location.
When adjusting keystone (tilt), ensure that the top and bottom edges of the image are horizontal
before you position the left and right edges of the image relative to your interactive whiteboard.
To fine-tune the image, you might need to repeat all steps described in the installation document in
smaller increments.
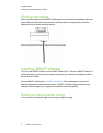
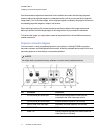
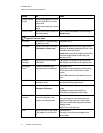
Projector connection diagram
You can connect a variety of peripheral devices to your projector, including DVD/Blu-ray players,
document cameras, and other high-definition sources, as well as peripheral device outputs such as a
secondary projector or other displays, and powered speakers.
N OT E
You might need to purchase third-party adapters to connect certain peripheral devices.
No. Connector Connect to:
1 3.5 mm phone jack audio input Audio sources associated with the computer
connected to the VGA video input source.
2 3.5 mm phone jack audio output External speakers (optional, not included)
3 DB15F RGB VGA video input Secondary computer (optional, not included)
4 DB9F RS-232 ECP cable harness
5 HDMI1 In
Primary computer high-definition media (audio and
video) source (not included)