


Chapter 31 LAN Setup
ZyWALL 2WG User’s Guide
563
31.4.1 IP Alias Setup
IP alias allows you to partition a physical network into different logical networks over the
same Ethernet interface. The ZyWALL supports three logical LAN interfaces via its single
physical Ethernet interface with the ZyWALL itself as the gateway for each LAN network.
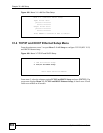
Use menu 3.2 to configure the first network. Move the cursor to the Edit IP Alias field, press
[SPACE BAR] to choose Yes and press [ENTER] to open Menu 3.2.1 - IP Alias Setup, as
shown next. Use this menu to configure the second and third networks.
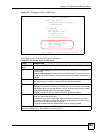
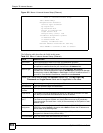
Figure 351 Menu 3.2.1: IP Alias Setup
Use the instructions in the following table to configure IP alias parameters.
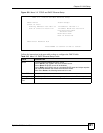
Menu 3.2.1 - IP Alias Setup
IP Alias 1= Yes
IP Address= 192.168.2.1
IP Subnet Mask= 255.255.255.0
RIP Direction= None
Version= RIP-1
Incoming protocol filters=
Outgoing protocol filters=
IP Alias 2= No
IP Address= N/A
IP Subnet Mask= N/A
RIP Direction= N/A
Version= N/A
Incoming protocol filters= N/A
Outgoing protocol filters= N/A
Enter here to CONFIRM or ESC to CANCEL:
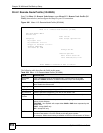
Table 212 Menu 3.2.1: IP Alias Setup
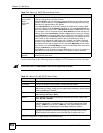
FIELD DESCRIPTION
IP Alias 1, 2 Choose Yes to configure the LAN network for the ZyWALL.
IP Address Enter the IP address of your ZyWALL in dotted decimal notation.
IP Subnet Mask Your ZyWALL will automatically calculate the subnet mask based on the IP address
that you assign. Unless you are implementing subnetting, use the subnet mask
computed by the ZyWALL.
RIP Direction Press [SPACE BAR] and then [ENTER] to select the RIP direction. Options are
Both, In Only, Out Only or None.
Version Press [SPACE BAR] and then [ENTER] to select the RIP version. Options are
RIP-1, RIP-2B or RIP-2M.
Incoming
Protocol Filters
Enter the filter set(s) you wish to apply to the incoming traffic between this node and
the ZyWALL.
Outgoing
Protocol Filters
Enter the filter set(s) you wish to apply to the outgoing traffic between this node and
the ZyWALL.
When you have completed this menu, press [ENTER] at the prompt [Press ENTER to Confirm…] to
save your configuration, or press [ESC] at any time to cancel.