INSTALLATION
INSTALL SYSTEM CABINETS
Before beginning the cabinet installation, position the cabinet table within 2
feet of the ac power receptacle. Make sure that the cabinets are easily
accessible from both the front and the back.
Position Cabinet(s)
Caution: A fully-equipped cabinet weighs 80 pounds.
1.
2.
3.
4.
Check
Unscrew and remove the upper rear panel of each
unscrew the lower part with the 12 connectors.
cabinet. Do not
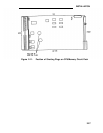
Near the center of the backplane, note an address plug in one of the
positions marked 1, 2, or 3 on the black address strip. (Position 4 is
not used.) This indicates the cabinet number for software purposes.
The position of the plug (1, 2, or 3) should agree with the position of
the cabinet (Cabinet 1 on the bottom, etc.).
Use the CAB 1, CAB 2, and CAB 3 labels from the cable label sheets
(Figure 2-7) to label each cabinet.
Position the cabinet label in the
box adjacent to connector 12 on the lower back panel. (The number
may have already been stamped by the factory.)
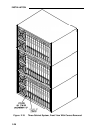
Stack the cabinets on top of one another on the stand. If there is
more than one cabinet, stack Cabinet 1 on the bottom arid Cabinet 3
on the top. Cabinet 1 contains the CPU/Memory (ZTN129 or
ZTN130 [R3]), and Service (ZTN85 or ZTN131 [R3]) circuit packs
(Figure 2-1 O). Do not replace the upper back panels yet.
Cabinet Contents
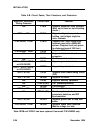
Check to make sure that the cabinets have been delivered with the correct
circuit packs (CPs). Table 2-B lists available CPs, their functions, and their
protectors.
If the system has TN760B Tie Trunk CPs, you may also have to
set the option switches on the CPs. See “Set TN760B Option Switches” in
Appendix C for details.
November 1995
2-23


