


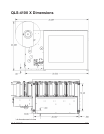
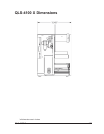

QLS-4100 X 94
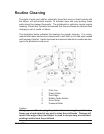
Platen Replacement
Platen rollers are like tires on a car, in that they wear with use. After continued
normal use, it may be necessary to replace the printhead platen rollers. After
prolonged use, one or more rollers may develop flat areas which will affect print
quality. The following procedures explain how to remove and replace the platen
rollers.
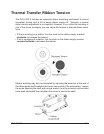
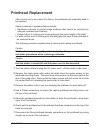
Turn the printer off and unplug the AC power cord. Lift the printer’s side cover.
Flip the printhead cam into the up position.
Remove any label stock that may be positioned over the platen roller.
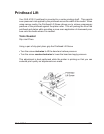
Remove the two outside screws from the shaft end plate at the outer end of the
platen shaft on the frame plate.
Reach under the printer to loosen the collar on the outside end of the platen roller
by turning the black lever counterclockwise.
Slide the plate and shaft assembly away from the frame plate. The collar and
roller will drop down as this assembly is pulled away from the frame plate.
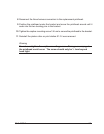
Reinsert the small plate and shaft assembly into the hole in the side plate. Add the
collar over the shaft behind the side plate.
Line up the new roller under the printer with the shaft. Be sure the roller end with
the 1/8” bearing surface is against the main plate on the inside of the printer.
Insert the shaft end plate assembly all the way through the roller. Secure the shaft
end plate with the two outside screws.
Push the collar against the platen roller to reduce the side play and tighten the
lever by turning it clockwise.
1
2
3
4
5
6
7
8
9
10